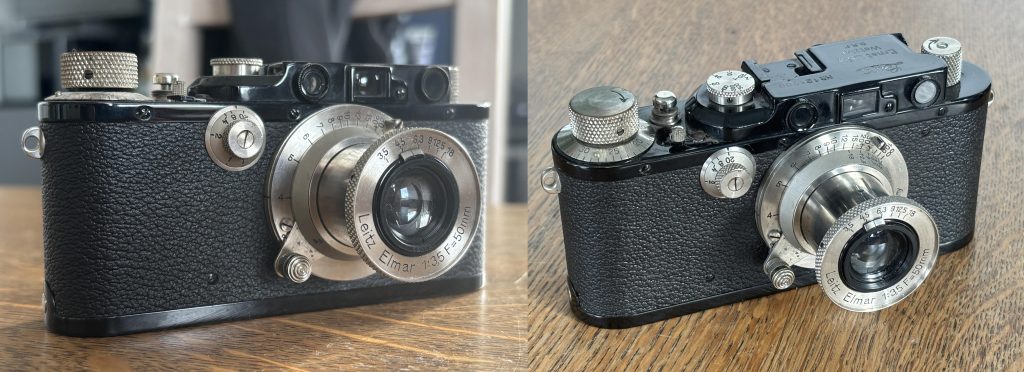
Great product photos don’t just show an object — they remove doubt. Whether you’re listing on a marketplace, your own store, or social media, your images answer the buyer’s silent questions: What condition is it in? How big is it? Is it worth the price?
Here’s a clear, strategic guide to photographing items so they sell faster and for more.
1. Start With the Buyer’s Mindset
Before you even pick up your camera, ask:
• What would I want to see before buying this?
• What flaws would worry me?
• What details justify the price?
Think like someone scrolling quickly. Your first image must stop them. The rest must build confidence.
2. Light Is More Important Than Your Camera
You do not need expensive gear. You do need good light.
Best option: Window light • Place the item near a large window. • Turn off indoor lights (they create color casts). • Shoot during bright but indirect daylight.
Avoid: • Direct overhead lighting (harsh shadows). • On-camera flash (flattens texture and looks amateur). • Mixed light sources (yellow + blue tones together).
If shadows are too dark, place a white poster board opposite the window to bounce light back.
Make sure the product is being lit from the front when using window lighting rather than backlit as this will create shadows that hide subject detail.
3. Clean and Prepare the Item
Your camera sees dust you don’t.
• Wipe surfaces thoroughly.
• Remove fingerprints.
• Iron clothing.
• Polish metal.
• Remove stickers unless they add value.
For collectibles or books, clean gently to avoid damage. For electronics, power them on so buyers see they work.
A quick clean before photographing the item will ensure any dust / marks are removed
4. Choose a Background That Supports the Product
The background should never compete with the item.
Safe choices: • White wall • Neutral fabric • Wooden table • Seamless paper
If you’re selling premium goods, the background should feel premium. If you’re selling everyday items, keep it simple and honest.
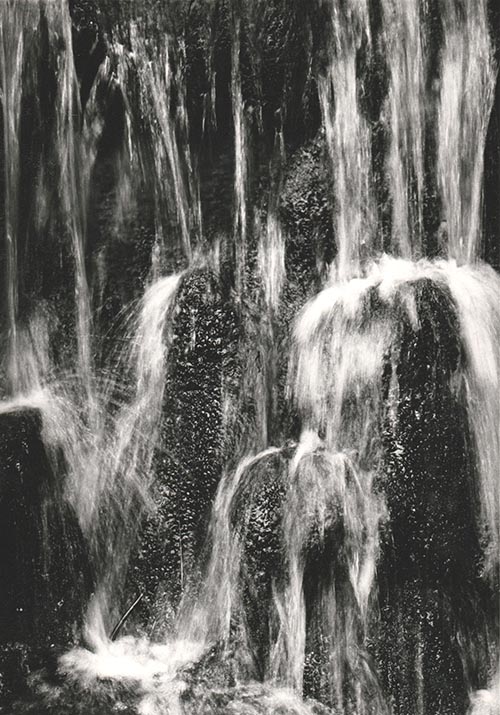
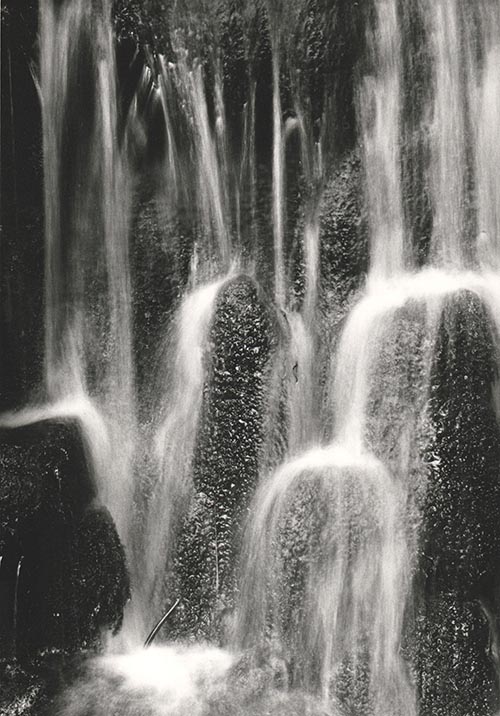
In the above example photos the first has a noisy background to distract. The second has a background that will cause a colour cast. The third is unclean and its lighting creates shadows. The fourth has good neutrality and results in an accurate colour with no distractions.
5. Use a Simple Shot Checklist
Every listing should include:
1. Hero shot – the best, cleanest angle.
2. Front view
3. Back view
4. Side or profile
5. Close-up of key details
6. Close-up of flaws (be transparent)
7. Scale reference (next to a common object or ruler)
8. Label/brand tag
9. Accessories included
More angles = less uncertainty = fewer buyer questions.
Above left has a cluttered background and low profile, while the camera is sharp there are too many distractions. Right shows a better angle this one is known as the hero shot. If only one photo can be used this gives the best impression of the product.
6. Show Condition Honestly
Trust sells.
If there’s:
• A scratch
• A dent
• Wear on fabric
• Faded print
Photograph it clearly. Buyers who discover flaws after delivery leave bad reviews. Buyers who see them beforehand feel informed.
7. Shoot With Stability
Blurry photos destroy trust.
• Use both hands.
• Rest elbows on a surface.
• Lean against a wall.
• Use a cheap tripod if possible.
• Use your phone’s timer to avoid shake.
Sharpness matters more than fancy depth-of-field.
8. Frame for Platforms
Different platforms favor different crops.
• Square (1:1) works well for most marketplaces.
• Vertical (4:5) works well for social platforms.
• Leave some breathing room so nothing gets cropped in thumbnails.
Always check how your image looks as a tiny preview.
Your photo should justify your asking price before a buyer reads the description.
12. Batch Your Workflow
If selling multiple items:
• Photograph everything at once.
• Use the same lighting setup.
• Edit in one session.
• Name files clearly.
Consistency builds brand identity — even if you’re just an individual seller.
13. Small Tricks That Increase Perceived Value
• Shoot slightly above eye level for most objects. • Use diagonal angles for depth. • Leave negative space (feels premium). • Align edges straight. • Keep horizons level.
Subtle polish creates subconscious trust.
14. Test Before Posting
Ask yourself:
• Would I buy this based on these photos?
• Do the photos answer all obvious questions?
• Is anything confusing?
If buyers need to message you for basic information, your photos didn’t do their job.
Final Thought
Good product photography isn’t about art — it’s about reducing friction. Every photo should:
• Remove doubt
• Build trust
• Highlight value
• Support your price
When your images do those four things, your listings stop competing on price and start competing on presentation.
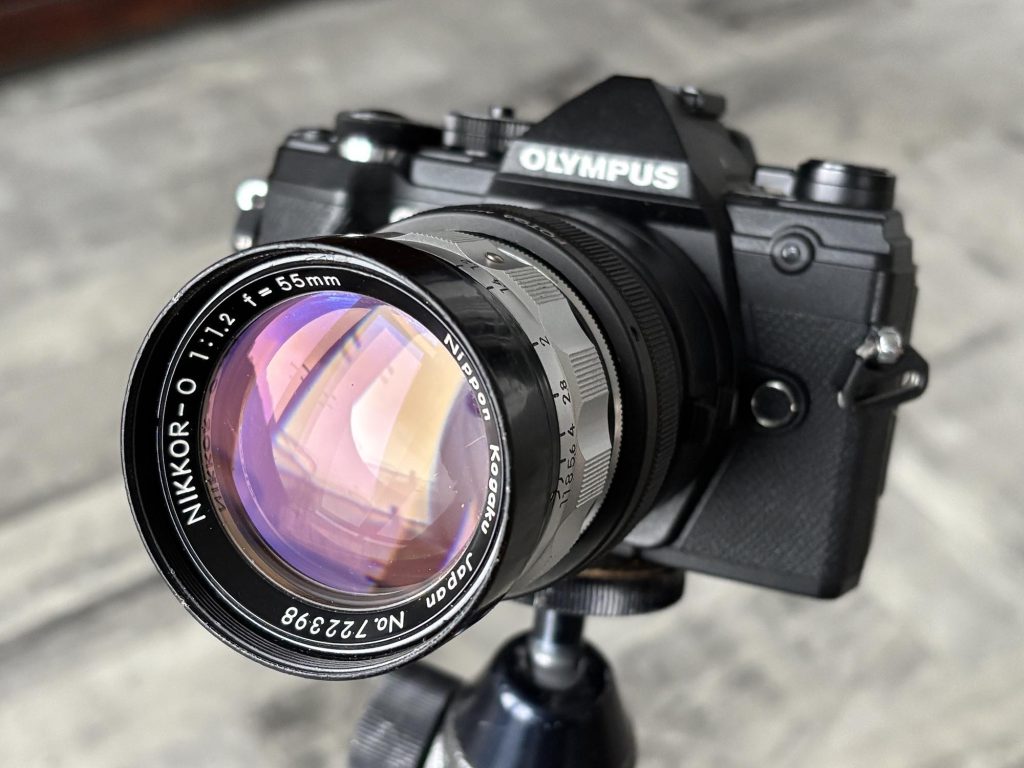
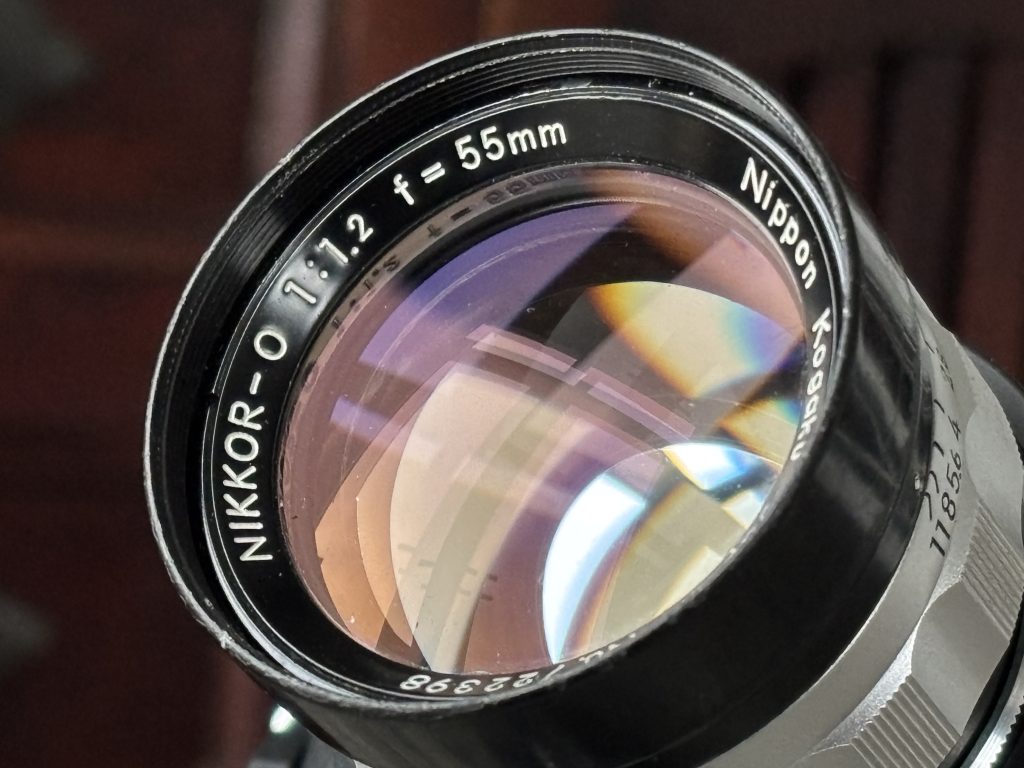
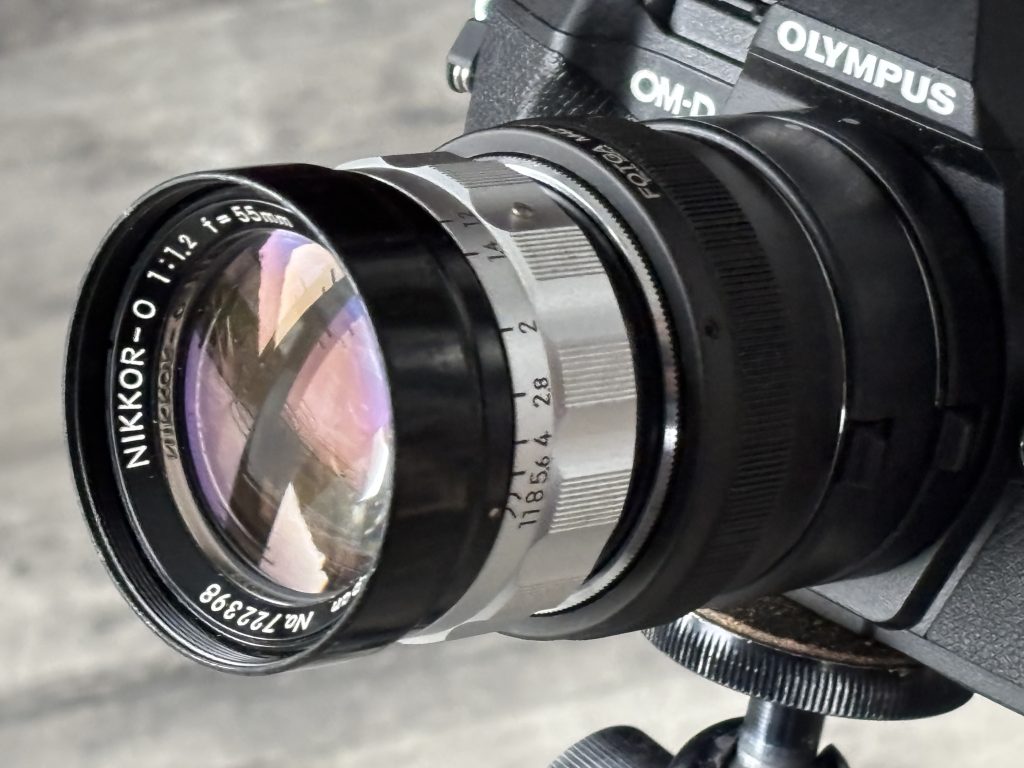
The Nikkor-O 55mm f/1.2 is one of Nikon’s most character-rich standard lenses. Produced in the late 1960s by Nippon Kagaku, it represents a transitional period when ultra-fast lenses were engineering statements as much as photographic tools. Today, it’s rare, collectible, and beloved for its distinctive rendering rather than clinical perfection.
This guide covers its history, optical character, handling, buying considerations, and how to get the best from it in modern use.
Historical Context
In the 1960s, pushing aperture boundaries was a prestige race among camera manufacturers. Nikon introduced the 55mm f/1.2 before the more common 50mm f/1.2 designs became standard. The “O” designation refers to its 7-element optical formula (“O” indicating seven elements in Nikon’s naming convention of the era).
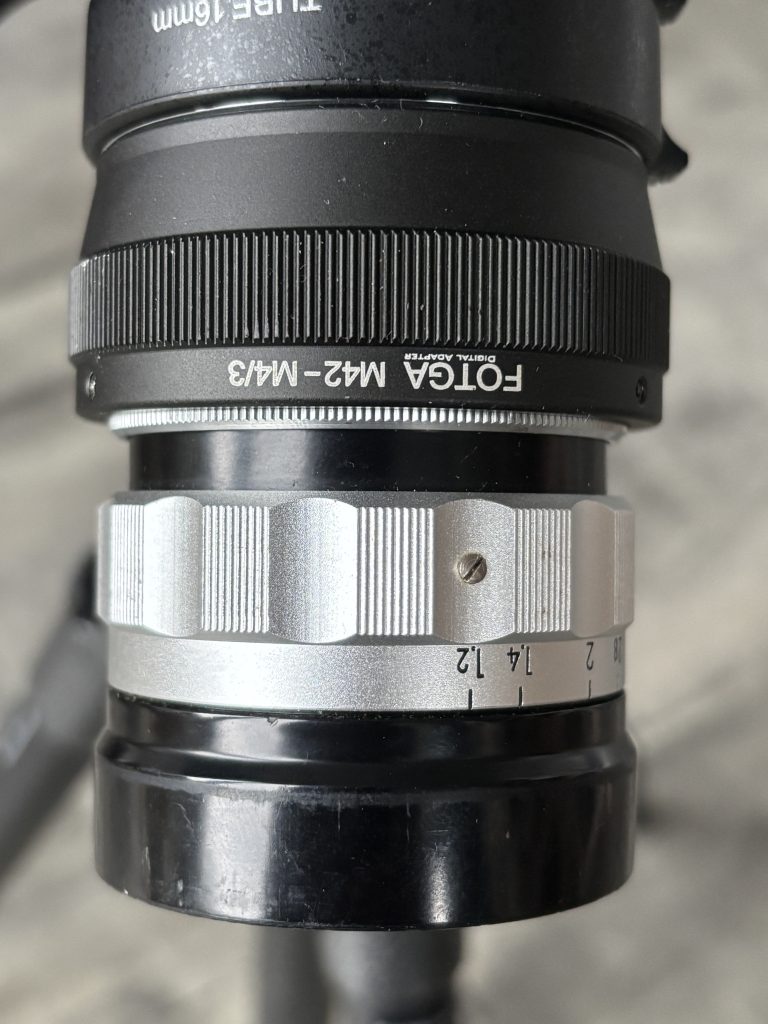
The lens is not designed to be mounted on a standard Nikon AI Mount SLR, and has a Leica M39 thread mount. You can buy an M39-to-Nikon F-mount adapter to mount the lens on a Nikon SLR.
The one I have for sale doesn’t have a thread so I’ve converted it to Micro 4/3rds for use on my Olympus E-M5III, using an adaptor previously used to convert M42 to M 4/3.
Production numbers were relatively low compared to later 50mm f/1.2 lenses, contributing to its rarity.
This is where the magic—and quirks—live: • Dreamy glow from spherical aberration • Lower contrast • Gentle highlight bloom • Swirly or nervous bokeh depending on distance
It is not clinically sharp at f/1.2. Instead, it produces an almost cinematic softness that flatters portraits and night scenes.
Stopped Down (f/2 – f/2.8) • Contrast increases dramatically • Sharpness improves significantly • Glow reduces but character remains
At f/2.8 and beyond, it behaves like a strong vintage standard lens with rich tonal rendering.
What Makes It Special
1. Transitional Rendering
Unlike modern ultra-fast lenses that aim for perfection wide open, this lens embraces imperfection. It’s expressive rather than analytical.
2. 55mm Focal Length
The slightly longer-than-50mm perspective: • Adds subtle compression • Feels natural for portraits • Gives a distinct look compared to standard 50mm lenses
3. Build Quality
Heavy, solid brass construction Long, smooth focus throw Deep mechanical feel typical of late-60s Nikon craftsmanship
Compatibility Guide
Because most copies are Pre-AI, mounting them on modern Nikon DSLRs without modification can damage the camera’s aperture indexing tab.
Because this lens is rare, condition matters greatly.
What to Check:
1. Fungus & Haze Fast vintage lenses are prone to internal haze due to aging coatings.
2. Oil on Aperture Blades Check for smooth, snappy aperture action.
3. Serial Numbers Early and late batches show minor cosmetic differences, but optical formula remains consistent.
Price Range
Prices vary depending on: • Condition • AI conversion • Cosmetic wear • Market demand
Expect it to command a premium over standard vintage 50mm f/1.2 lenses due to rarity.
Shooting Tips
1. Embrace the Glow
Don’t fight the softness wide open. Use it intentionally.
2. Control Flare
It can flare dramatically. Use: • A deep lens hood • Careful light positioning
3. Focus Carefully
At f/1.2, depth of field is razor thin. Use: • Focus magnification (mirrorless) • Split-prism screens (film bodies)
4. Black & White Magic
The tonal transitions at f/1.2 are particularly beautiful in monochrome conversions.
How It Compares to Later Nikon f/1.2 Lenses
Compared to later 50mm f/1.2 designs: • More glow • Less correction • More vintage signature • Slightly more unique focal perspective
It feels less engineered for precision and more for character.
Collector Value
The Nikkor-O 55mm f/1.2 is desirable because: • It represents Nikon’s early ultra-fast design philosophy • It has limited production numbers • It offers rendering not easily replicated by modern lenses
Clean, original-condition copies are increasingly hard to find.
Who Should Buy It?
Buy this lens if you:
✔ Love vintage rendering ✔ Shoot portraits or atmospheric scenes ✔ Use mirrorless cameras ✔ Appreciate mechanical craftsmanship ✔ Want something rarer than a standard 50mm f/1.2
Avoid it if you:
✘ Need edge-to-edge sharpness at f/1.2 ✘ Prefer modern contrast and coatings ✘ Don’t want to deal with manual focus
Final Thoughts
The Nikkor-O 55mm f/1.2 is not about technical perfection. It’s about atmosphere, mood, and character. It’s a lens from an era when speed was ambitious and flaws were part of the signature.
In a world of optically flawless modern glass, this lens stands out precisely because it isn’t flawless — and that’s why it remains one of Nikon’s most intriguing rare classics.
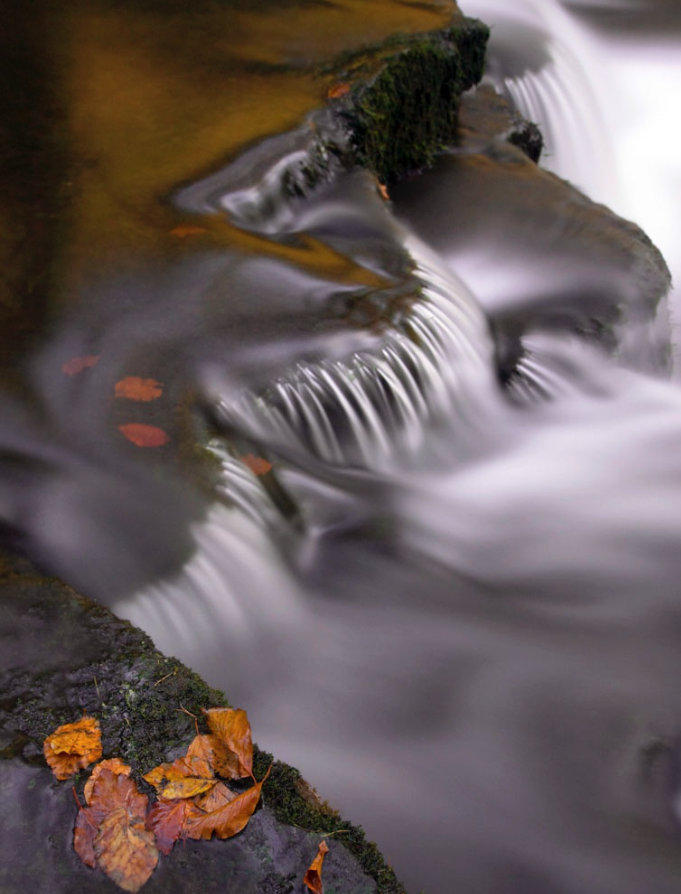
Shutter speed is the single most critical variable in waterfall photography. It determines not just exposure, but the emotion of the water.
Most guides offer a binary choice: “freeze” the water or “blur” it. This guide focuses on the Texture Spectrum – finding the specific speed that matches the personality of the waterfall you are photographing.
Waterfall Texture Spectrum
Instead of guessing, use this spectrum to decide what story you want to tell.
1 : The “Power & Chaos” Zone (1/500s or faster)
The Look: Violent, crisp, and detailed. Every droplet is frozen in mid-air.
Best For: Massive, roaring waterfalls where you want to convey danger or raw power.
Technique:
Mode: Shutter Priority (Tv or S).
ISO: You may need to bump ISO to 400 or 800 to maintain this speed in shady glens.
Burst Mode: Fire a rapid burst. Since water moves chaotically, one frame will often have a better “shape” of splash than the others.
2 : The “Structured Flow” Zone (1/15s – 1/2s)
The Look: This is the underused “Sweet Spot.” The water has motion and direction, but it retains texture. It looks like “stringy muscle” rather than “white milk.” It looks real, but slightly dreamlike.
Best For: Waterfalls with interesting rock formations behind the water, or multi-tiered cascades.
Technique:
Stability: A tripod is mandatory here. Hand-holding will result in a blurry landscape, not just blurry water.
Filter: You usually do not need a heavy Neutral Density (ND) filter here; a polarizer is often enough to cut the glare and slow the shutter just enough.
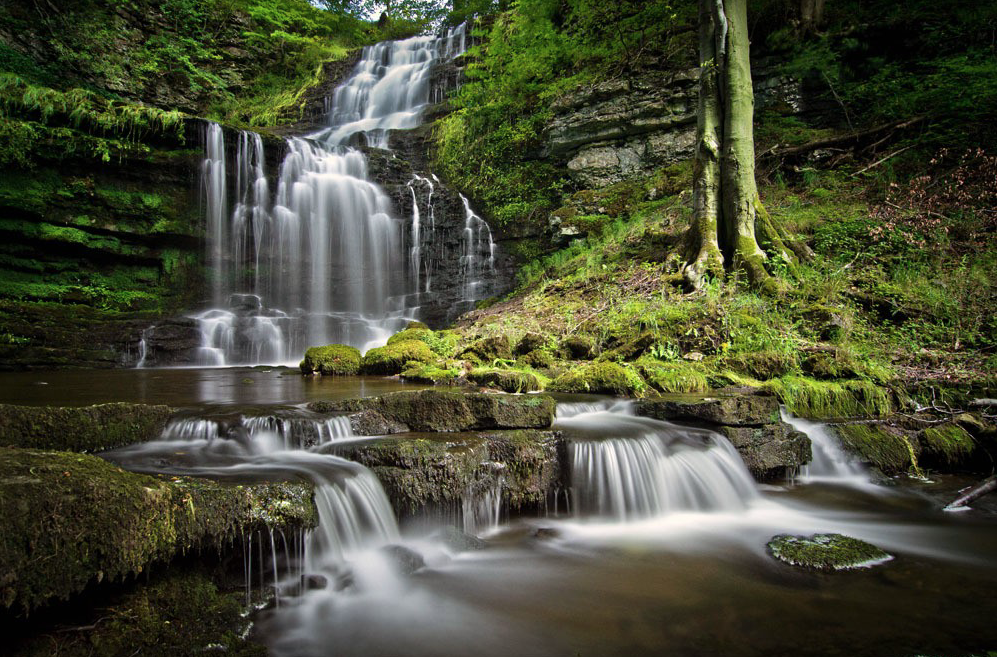
3 : The “Ethereal Silk” Zone (1s – 5s+)
The Look: The classic “calendar” look. The water becomes a solid, smooth white sheet. It creates a sense of peace and abstraction.
Best For: Thin, spindly waterfalls or scenes where you want to simplify a messy composition.
Technique:
ND Filter: Essential. You cannot achieve a 2-second exposure in daylight without blocking light. A 3-stop (ND8) or 6-stop (ND64) filter is standard.
Cover the Viewfinder: On DSLR cameras, light can leak in through the viewfinder during long exposures and ruin the shot. Cover it with your thumb or the provided cap.
Pro Tip If the water is bright white foam, it will lose detail (blow out) very quickly. Underexpose your image by -0.3 or -0.7 EV to protect the highlights in the water.
The Math of Flow
The speed of the water dictates the shutter speed required.
Fast rushing water needs a faster shutter speed to blur (because it moves across the frame quickly).
Slow trickling water needs a slower shutter speed to show any motion at all.
If you want to calculate the perfect blur, a good rule of thumb for the “Structured Flow” look is: T=1 / 2 x V
Where T is shutter speed and V is the estimated velocity of water in feet per second. (e.g., if water moves at 15 fps, try 1/30th of a second).
The “Pocket Long Exposure” (Using a Phone) You don’t need a DSLR to drag the shutter. Modern phones have computational photography tricks that simulate long exposures perfectly without a tripod.
Method A: The iPhone “Live Photo” Hack (Easiest) This is a hidden feature that mimics a 3-second shutter speed. 1. Turn on Live Photos (the concentric circle icon in the camera app). 2. Take the shot. Hold as still as possible, but a tripod isn’t strictly necessary. 3. Open the Photo in your gallery. 4. Tap the “Live” menu (top left corner) and select “Long Exposure”. The phone blends the video frames from the Live Photo into a single silky image, effectively creating a ~3-second exposure.
Method B: Android “Pro Mode” (Best Quality) Most Android flagships (Samsung S-series, Pixel, etc.) have a Pro/Manual mode. 1. Open Camera > More > Pro Mode. 2. Set ISO to 50 (or the lowest possible number). 3. Adjust Shutter Speed: Dial it to 1/10 or 1/4. 4. The “Sunglass Hack”: If the image is completely white (overexposed), hold your sunglasses over the phone lens. This acts as a makeshift Neutral Density filter, cutting the light and allowing you to use slower speeds.
Method C: Third-Party Apps If your native camera app is limited, use dedicated apps that “stack” images to create blur. • iOS: Spectre Camera (uses AI to stabilize and blur). • Android: Camera FV-5 Lite or Motion Cam.
Quick Reference
Effect Desired
Shutter Speed
ND Filter needed
Best For
Freeze
1/500s+
No
Raging power
Texture
1/15sec-1/2sec
Polariser is enough
Rock detail
Silky Smooth
1-5sec
ND8 or ND64
Calm messy scenes
Abstract Mist
10s+
ND1000 (Big Stopper)
Minimalist Art
Essential Gear for Waterfall Photography
While you can take a snapshot with anything, controlling shutter speed requires specific tools to manage light and stability.
1 : Light Control
This is the most critical section. You cannot achieve slow shutter speeds during the day without these.
• Circular Polarizer (CPL) – The “Must-Have”:
• Why: It cuts the white glare off wet rocks and leaves, letting the deep green and stone colors shine through. It also acts as a weak Neutral Density filter, reducing light by about 1.5 to 2 stops (perfect for the “Structured Flow” look).
• 3-Stop ND Filter (ND8):
• Why: Perfect for shady glens or overcast days. It lets you slow the shutter to around 1/2s or 1s without making the image too dark to compose.
• 6-Stop ND Filter (ND64):
• Why: Essential for brighter conditions or when you want that long, 5s to 10s “silky” exposure.
• Step-Up Rings:
• Tip: Instead of buying filters for every lens size, buy filters for your largest lens (e.g., 77mm or 82mm) and buy cheap step-up rings to fit them onto your smaller lenses.
2 : Stability
Waterfalls are often found in dark canyons or deep woods, meaning exposure times are long. Hand-holding is rarely an option.
• Tripod (Low-Angle Capable):
• Look for a tripod where the center column can be removed or inverted. You often want to shoot from very low (1 foot off the ground) to include foreground rocks in the composition.
• Remote Shutter Release (or App):
• Pressing the camera button introduces vibration. Use a cable release, a wireless remote, or the 2-second self-timer built into your camera.
• L-Bracket (Optional but Recommended):
• Allows you to switch your camera from Landscape to Portrait orientation without flopping the tripod head over to the side (which shifts your centre of gravity and reduces stability).
3 : Spray Management
Waterfalls generate mist. Mist ruins sharpness.
• Microfiber Cloths (Many of them):
• Bring at least 3-4 dry cloths. Once one gets damp from spray, it just smears water across the lens rather than removing it.
• Rocket Blower:
• Use this to blow large droplets off the glass before wiping. Wiping a dusty lens with a cloth can scratch the coating; blowing it off first is safer.
• Shower Cap or Rain Sleeve:
• A cheap hotel shower cap is the perfect emergency rain cover for your camera body if the mist is heavy.
4 : Which Lens
• Wide Angle Zoom (e.g., 16-35mm):
• For capturing the grand scene and emphasizing foreground rocks.
• Telephoto Zoom (e.g., 70-200mm):
• Underrated: Use this to zoom in tight on specific sections of the fall for abstract, intimate textures (isolating just the water and a single fern, for example).
5 : Personal Safety & Comfort
• Good Grip Boots: Wet rocks are treacherous.
• Towel: For drying your hands (or your knees if you are kneeling in mud).
Capturing the aurora borealis is part science, part patience, and part magic. Use this guide to give yourself the best chance of returning home with truly stunning images.
🎒 1. Preparation Before You Go
Check the Forecasts
Aurora activity (Kp Index): Look for Kp 3+ for mid-latitudes; Kp 2+ is often sufficient in the Arctic.
Cloud cover: Clear or mostly clear skies are essential.
Moon phase: New moon or low moonlight reduces sky brightness.
Don’t hold the phone – movement will ruin the shot.
Wipe the lens (phone lenses fog easily).
Avoid digital zoom; move closer instead.
Test different shutter lengths until stars remain sharp.
🌍 TOP TEN LOCATIONS TO PHOTOGRAPH THE NORTHERN LIGHTS These locations offer reliable aurora activity, dark skies, and dramatic landscapes.
1. Tromsø, Norway High aurora frequency, accessible city, incredible fjords. 2. Abisko, Sweden Famous “blue hole” microclimate keeps skies clearer than surrounding regions. 3. Fairbanks, Alaska, USA Strong aurora zone, easy access, long season. 4. Yellowknife, Canada Flat horizons create uncluttered sky views—excellent for wide-angle shots. 5. Reykjavik Region & Þingvellir, Iceland Volcanic landscapes and easy access to dark skies. 6. Finnish Lapland (Rovaniemi, Saariselkä) Snow-covered forests make perfect foregrounds. 7. Svalbard, Norway Auroras even in daylight during polar night. 8. Kangerlussuaq, Greenland Minimal light pollution and frequent clear skies. 9. Murmansk & Kola Peninsula, Russia High latitude with unique Arctic landscapes. 10. Scottish Highlands & Isle of Skye, UK Best low-latitude aurora spot in Europe during strong solar storms.
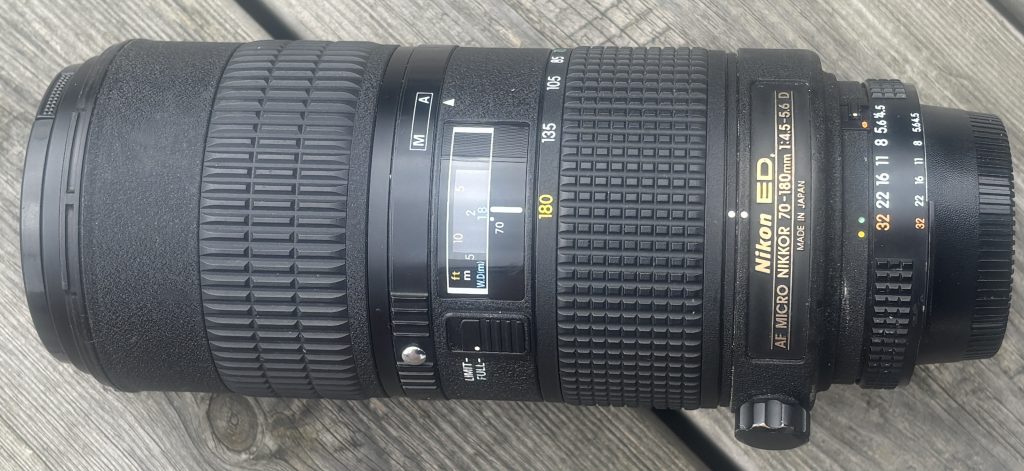
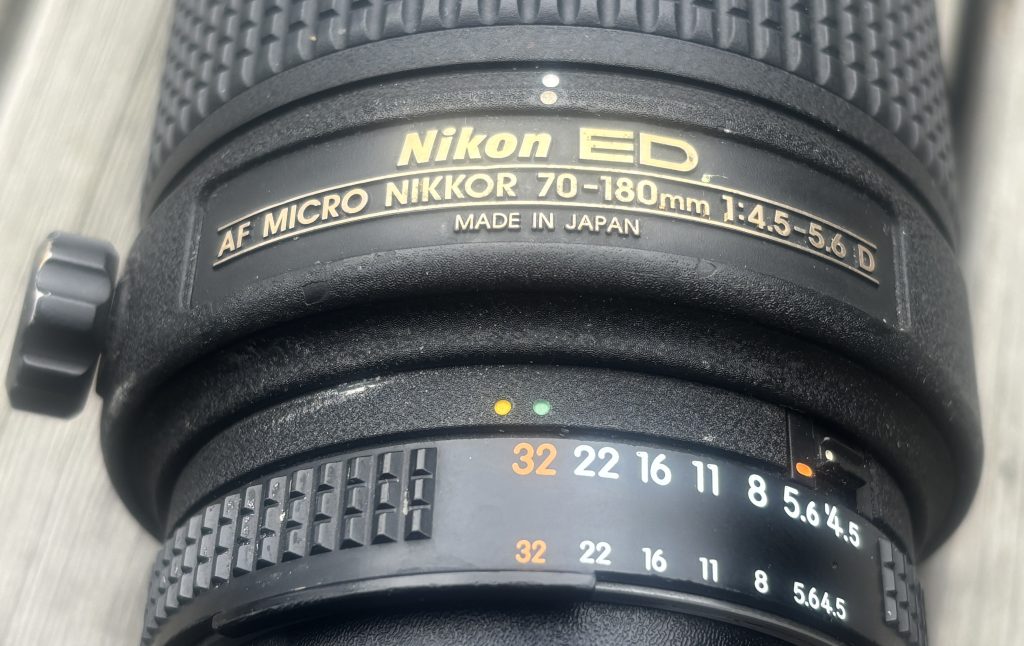
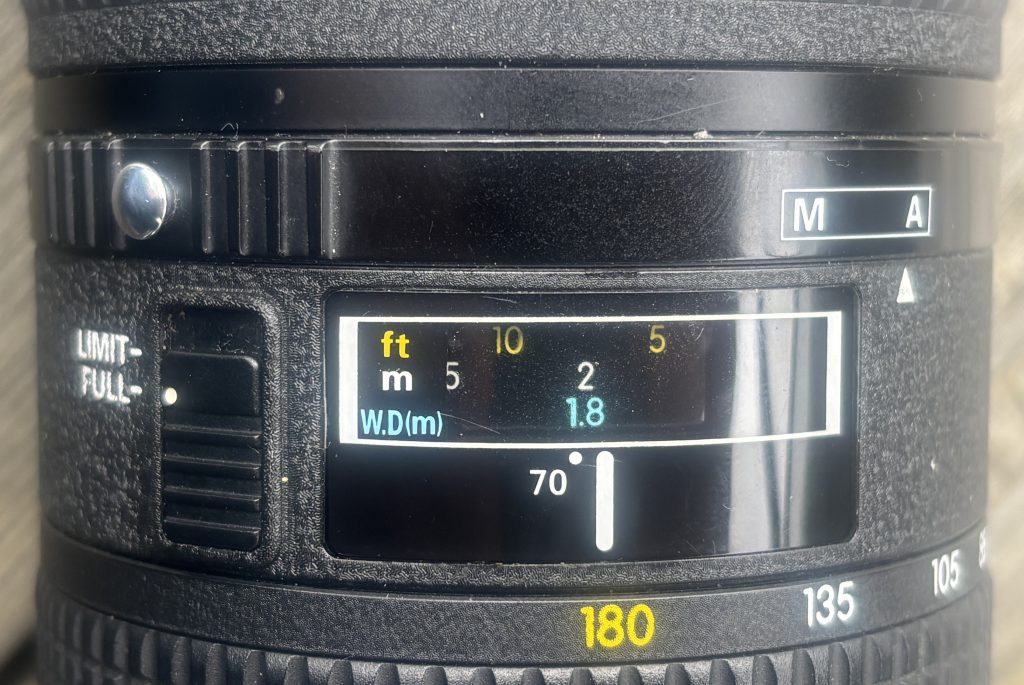
The Nikon 70–180mm Micro is one of the most unusual lenses Nikon ever produced. Released in the late 1990s, it remains the only zoom lens Nikon designed specifically for macro work. Its combination of flexible framing, close-focus capability, and classic F-mount ergonomics makes it a cult favourite among macro specialists and collectors.
Below is a practical, and technical guide to help you decide whether this lens is right for you — and what to look for when buying one today.
1. What Makes This Lens Unique
Unlike conventional telephoto zooms, the 70–180mm Micro was engineered to maintain high optical performance at close-focus distances.
The standout features are:
True macro-centric optical design
Most zooms “can focus close,” but this lens was built to deliver macro-level magnification and edge-to-edge correction. It reaches approximately 1:1.3 reproduction, which is unusually high for any zoom.
Zoom flexibility at macro distances
At close range, small adjustments in camera position drastically change your composition. Being able to zoom instead of physically moving makes macro shooting faster, steadier, and more precise.
Very stable working distance
The lens doesn’t require you to get extremely close to your subject to get strong magnification, which is useful for shy insects, controlled studio setups, or maintaining clean lighting.
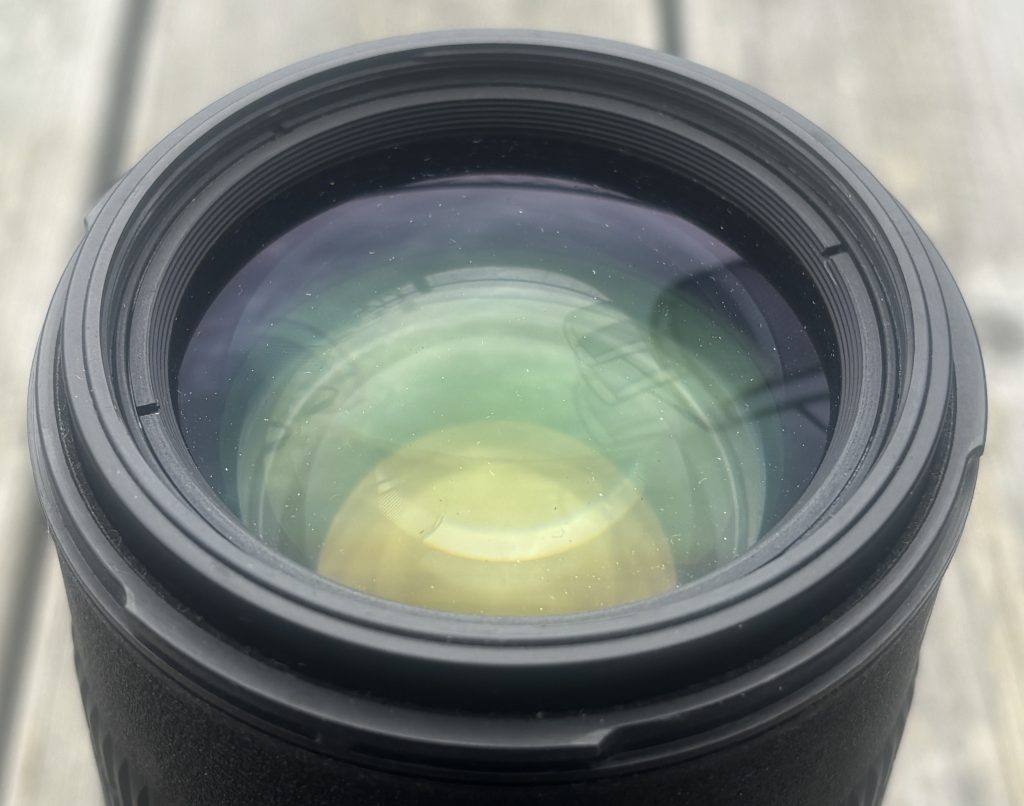
2. Optical Performance
Macro / close-up behaviour
This is where the lens shines. Sharpness in the center is excellent when stopped down slightly, contrast holds well, and chromatic aberrations are well-controlled for a zoom of this age. Performance is strongest in the mid-range (around 100–150mm).
Long-distance behaviour
At normal shooting distances, sharpness is more modest. Corners soften noticeably at the 180mm end unless stopped down. If your primary use is wildlife or sports, this isn’t the ideal lens — its optical strengths are clearly tailored to close-range imaging.
Bokeh and rendering
The lens produces smooth, clean foreground/background blur due to its long focal length and relatively simple optical formula. The aperture is not especially wide, so background separation relies more on focal length and distance than on shallow depth-of-field.
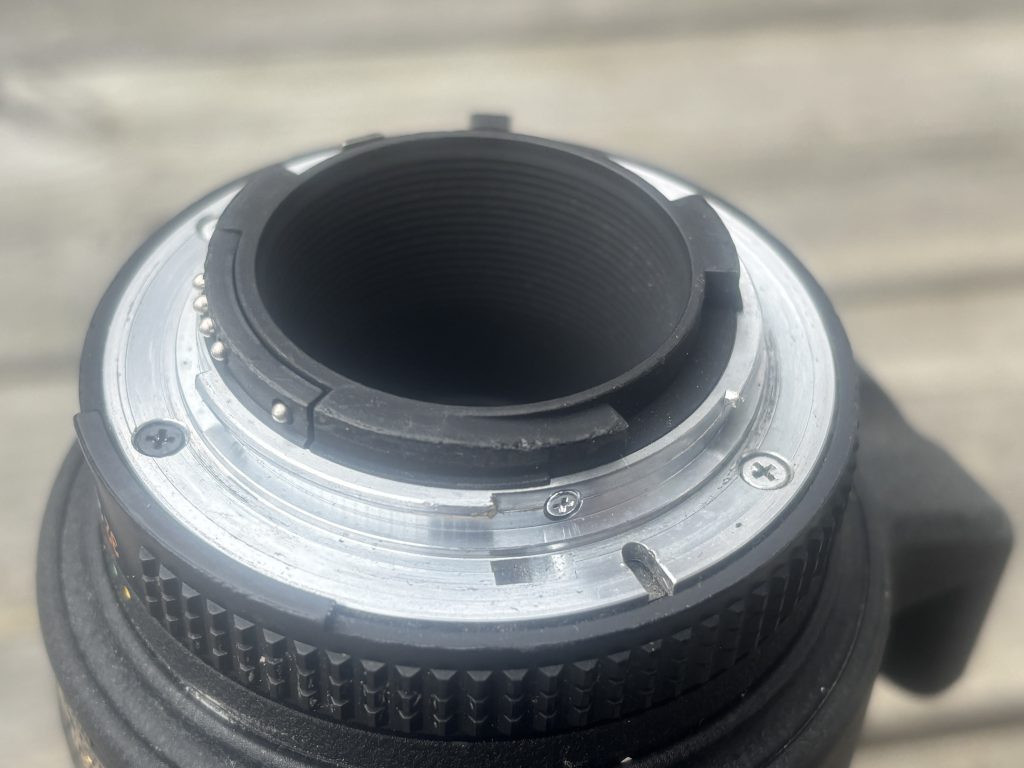
3. Autofocus & Handling
Autofocus
Being an older AF-D lens, it relies on the camera’s screw-drive motor.
Expect:
Audible, mechanical AF noise
Slower autofocus compared to modern AF-S or Z lenses
Decreased AF reliability at macro distances (normal for most macro lenses)
Many users treat it as a manual-focus-first lens, especially for macro photography where precision beats speed.
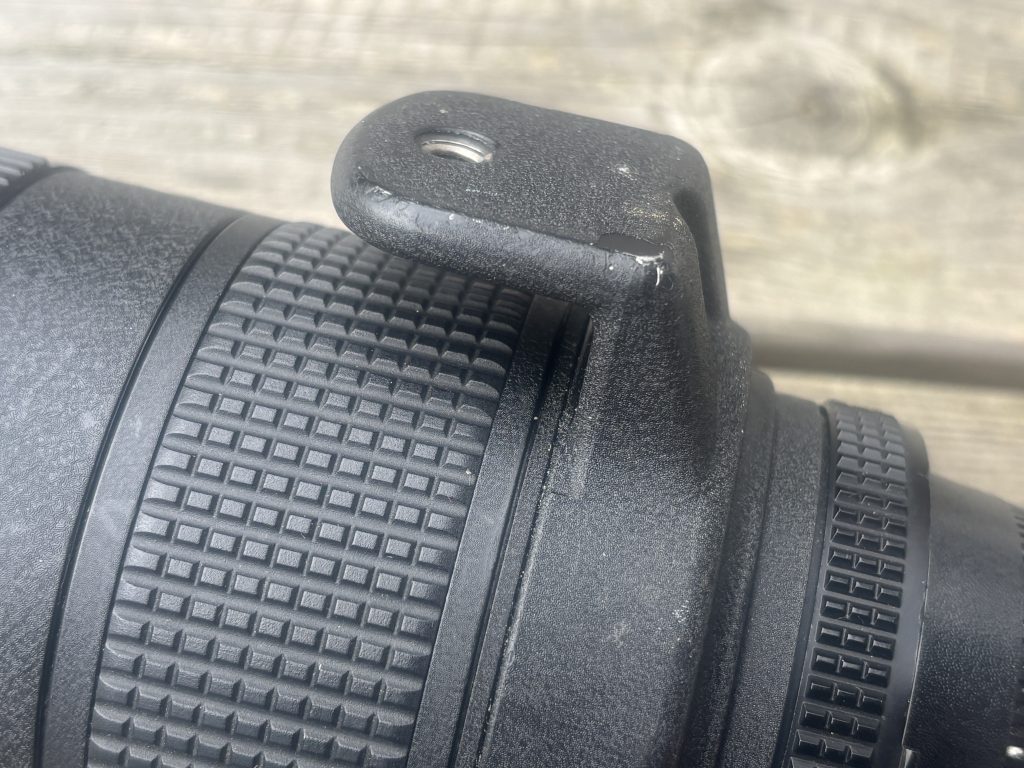
Build quality & ergonomics
Sturdy construction with classic late-film-era Nikon materials
Large, well-damped zoom ring
A dedicated tripod collar for stable macro work
No weather sealing
No internal focusing — the lens grows longer as it focuses
Despite being a zoom macro, it balances well on mid-sized DSLR bodies and adapts smoothly to Z-mount via FTZ.
4. Compatibility
On Nikon DSLRs (F-mount)
Full autofocus available only if the camera has a built-in screw-drive motor.
(D7500 downwards users will not get AF.)
Metering and exposure modes work on all modern DSLRs.
On Nikon Z mirrorless
Requires FTZ or FTZ II adapter
Autofocus operates using the mechanical coupling but is noticeably slower
IBIS (in-body stabilization) helps compensate for the lack of VR in the lens
If you’re a Z-mount macro shooter comfortable with manual focus, this lens adapts surprisingly well.
5. Ideal Use Cases
This lens suits photographers who need macro versatility, including:
Botanical photography
Product & tabletop work
Jewelry, collectibles, and small objects
Controlled studio macro
Insect or reptile photography where extra working distance is helpful
Film-era collectors who appreciate rare Nikon optics
It is not ideal for:
Fast action
Portrait work requiring fast AF
Low-light handheld telephoto shooting
Travel situations where weather sealing is needed
6. What to check on a used /second-hand version
Because all examples are now decades old, condition matters more than usual.
Check these critically:
1. Optical condition
Look for internal haze, fungus, or separation
Inspect for dust clusters (small dust is normal; large clumps affect contrast)
Shine a light through the lens to check for fogging or residue
2. Aperture mechanism
Aperture blades should be dry, snappy, and evenly responsive
Any visible oil is a red flag
3. Focus & zoom rings
Both should turn smoothly with no grinding
Excess stiffness or looseness indicates mechanical wear
Check for zoom creep when pointing downwards
4. Tripod collar
Should rotate smoothly and lock firmly
Missing collars reduce the lens’ usability and resale value
5. Autofocus coupling
Test AF on a camera body with screw-drive capability
Listen for grinding or misalignment
6. Exterior condition
Look for dents near the filter thread or evidence of drops
Confirm the front and rear caps are included
Check if the lens hood fits securely
7. Price Expectations (Typical Used Market)
(General ranges—not pulled from any specific listing)
Excellent condition: high end of used pricing
Good condition: mid-range pricing
Collector-grade: sometimes significantly above normal market value
Poor / fungus / stiff rings: strongly discounted and generally not worth buying unless you plan to repair
This is a sought-after lens, so prices vary more widely than typical 20-year-old zooms.
8. Should You Buy It?
If you want a macro lens that gives you the flexibility of a zoom, this is essentially the only Nikon-made option — and still an extremely capable one. Its image quality at close distances rivals many primes, and the ability to fine-tune framing without moving the camera is a powerful advantage.
If you need fast AF, VR, modern coatings, or uncompromising telephoto sharpness, you should look elsewhere. But for macro shooters, product photographers, or Nikon collectors, the 70–180mm Micro remains a uniquely valuable tool.
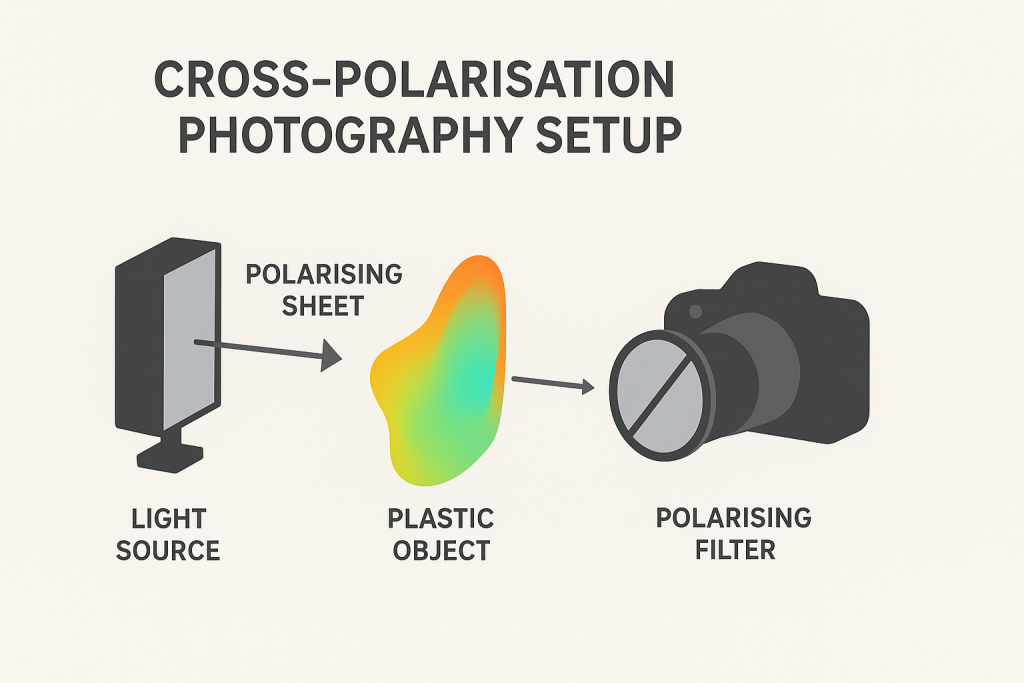
Cross-polarisation (or “cross-pol”) is a photographic technique where two polarising filters – one on the light source and one on the camera – are set at 90° to each other. When aligned correctly, the filters eliminate specular reflections and can reveal birefringence patterns in certain materials.
This guide walks you through exactly how to do it, using both studio and DIY setups.
1. Understanding the Core Concept
Light waves vibrate in all directions. A polarising filter only lets waves through that vibrate in one direction.
Polariser A (on the light): Makes the light “uniform,” allowing only one vibration direction.
Polariser B (on the lens): Blocks that direction and only passes waves vibrating 90° to it.
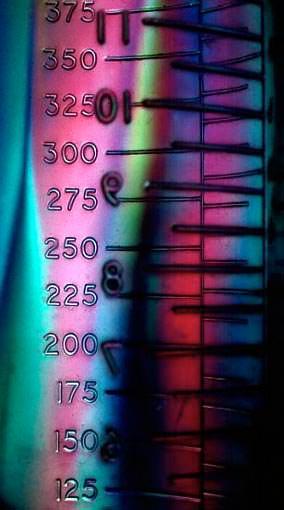
When the two filters are crossed, reflections vanish—but internal stress patterns inside transparent plastics glow with vivid colours.
Think of it as cancelling the surface glare so you can see the hidden interior world.
2. What You Need
You don’t need a fancy studio. Here are options for every budget:
Essential Equipment
A camera (phone, mirrorless, or DSLR)
A polarising filter for the lens
Circular polariser (CPL) for most photography
A polarising sheet for your light source
Linear polarising film is inexpensive and sold in A4 sheets
Optional but helpful
Two or more small LED panels (or even tablet screens)
Diffuser (white fabric or tracing paper)
Tripod (recommended)
Black background
3. Setting Up the Cross-Pol Lighting
Step A: Polarise your light
Place the polarising sheet in front of your light source.
If your light produces hotspots, add a diffuser behind the polarising film.
Make sure the polarising film covers the light completely – any uncovered portion will leak unfiltered light into your shot.
DIY tip:
A tablet or phone screen already emits polarised light – great for photographing small plastics like cutlery or toys.
4. Prepare Your Camera
Attach the CPL to your camera or phone adapter.
Point the camera at the polarised light.
Rotate the CPL slowly.
You’ll notice the light visibly darkening when the two polarisers reach a 90° relationship.
This is your cross-polarisation achieved.
5. Shooting Techniques
A. For Stress-Pattern Photography
Used with clear or translucent plastics.
Place the plastic object between the light and the camera.
Cross the polarisers (maximum black).
Increase exposure slightly to compensate for light loss.
Fine-tune the angle of the object – some stress patterns appear only at certain orientations.
Use a black or very dark background to intensify colours.
Common objects that reveal stunning patterns:
Sunglasses
Water bottles
Tape dispensers
Plastic spoons
Acrylic sheets
B. For Reflection-Elimination Photography
Used for glossy surfaces, jewellery, metal, and liquids.
Position your subject so the polarised light hits it at ~45°.
Rotate the CPL until reflections disappear.
Adjust your lighting angle if you see “patches” of unpolarised reflections.
This is extremely useful for product photography.
6. Exposure and Camera Settings
Cross-pol setups reduce the amount of light reaching the sensor. To compensate:
Increase ISO moderately (200–800)
Use longer shutter speeds (especially with tripod)
Open your aperture (f/2.8–f/5.6 works well)
Avoid raising ISO too high, as cross-pol images often contain smooth gradients where noise becomes visible.
7. Compositional Tips
Use backlighting for the strongest birefringence effects.
Rotate the subject slowly – stress colours shift dramatically.
Try using two polarised lights for symmetrical objects.
For artistic images, place multiple plastic objects overlapping to create abstract colour fields.
8. Troubleshooting
Problem: Colours look flat or dull
The polarisers may not be perfectly crossed – rotate the CPL again.
Your light source might not be fully covered by polarising film.
Problem: Still seeing reflections
Some reflections can bounce off walls and bypass the film – darken your shooting environment.
Check if any secondary light source is unpolarised.
Problem: Image too dark
Add more light intensity.
Widen your aperture.
Use longer exposure.
Problem: Colour bands too chaotic
Stress in objects varies naturally; try a different piece of plastic or rotate the one you’re using.
9. Creative Experiments
Try these once you’ve mastered the basics:
Cross-Polarised Portraits
This requires larger sheets of polarising film but removes skin shine and gives a matte, painterly look.
Cross-Pol Liquid Photography
Put clear liquids in glass containers – some oils and gels show subtle interference colours.
Scientific Documentation
This technique is used in archaeology and materials analysis to detect manufacturing stress patterns.
10. Final Tips for Better Results
Keep the scene as simple as possible – controlled light is everything.
Always clean your polarisers; smudges will show.
Work slowly: tiny adjustments create dramatic changes.
Embrace the unpredictability – cross-pol is part science, part magic.
You can buy your polarising filter from Photography Attic here: Polarising filters
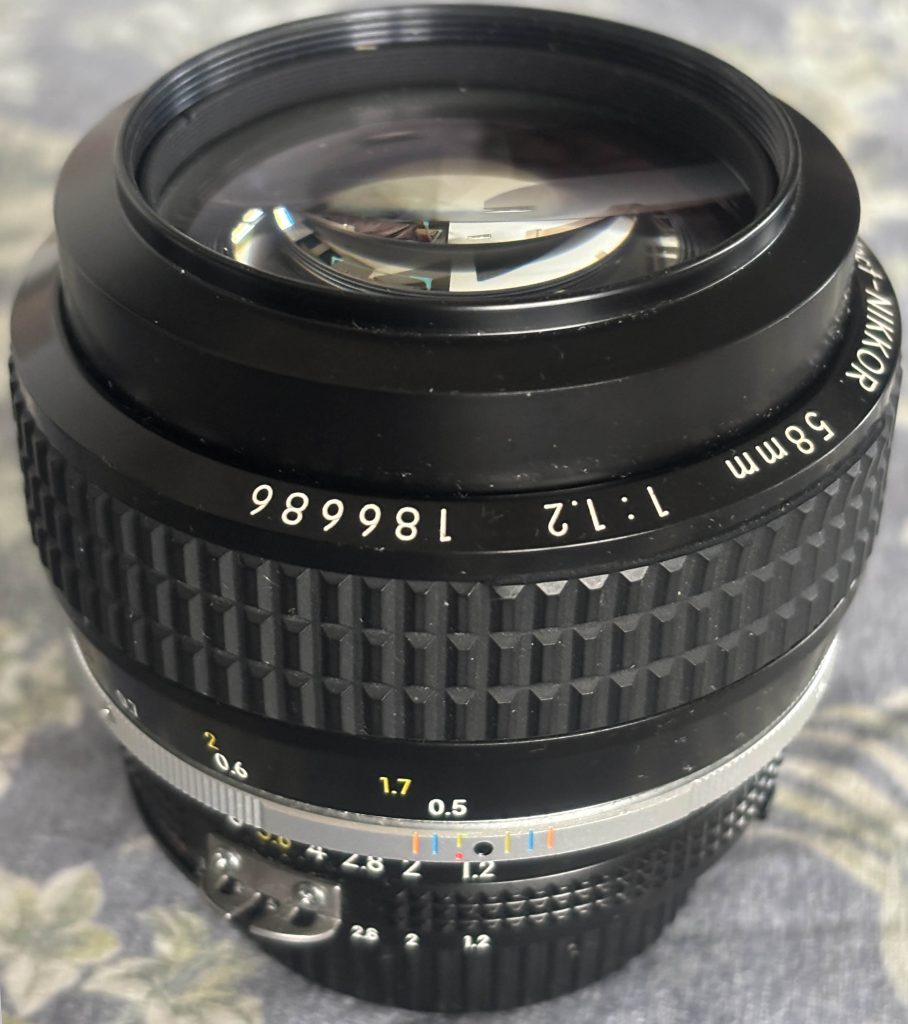
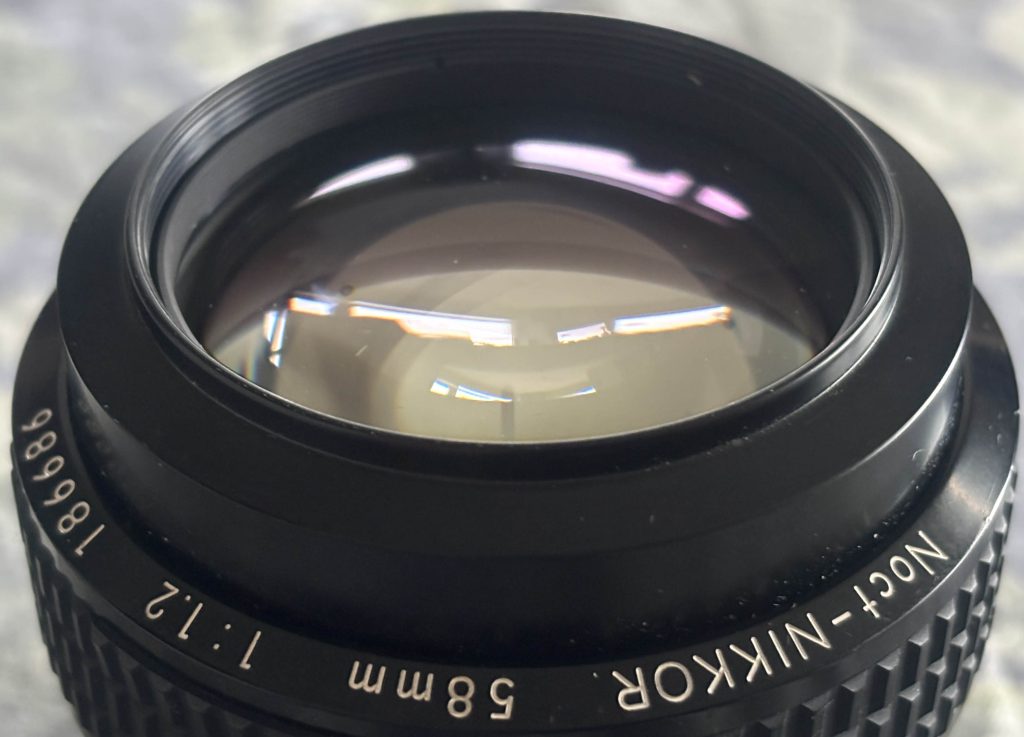
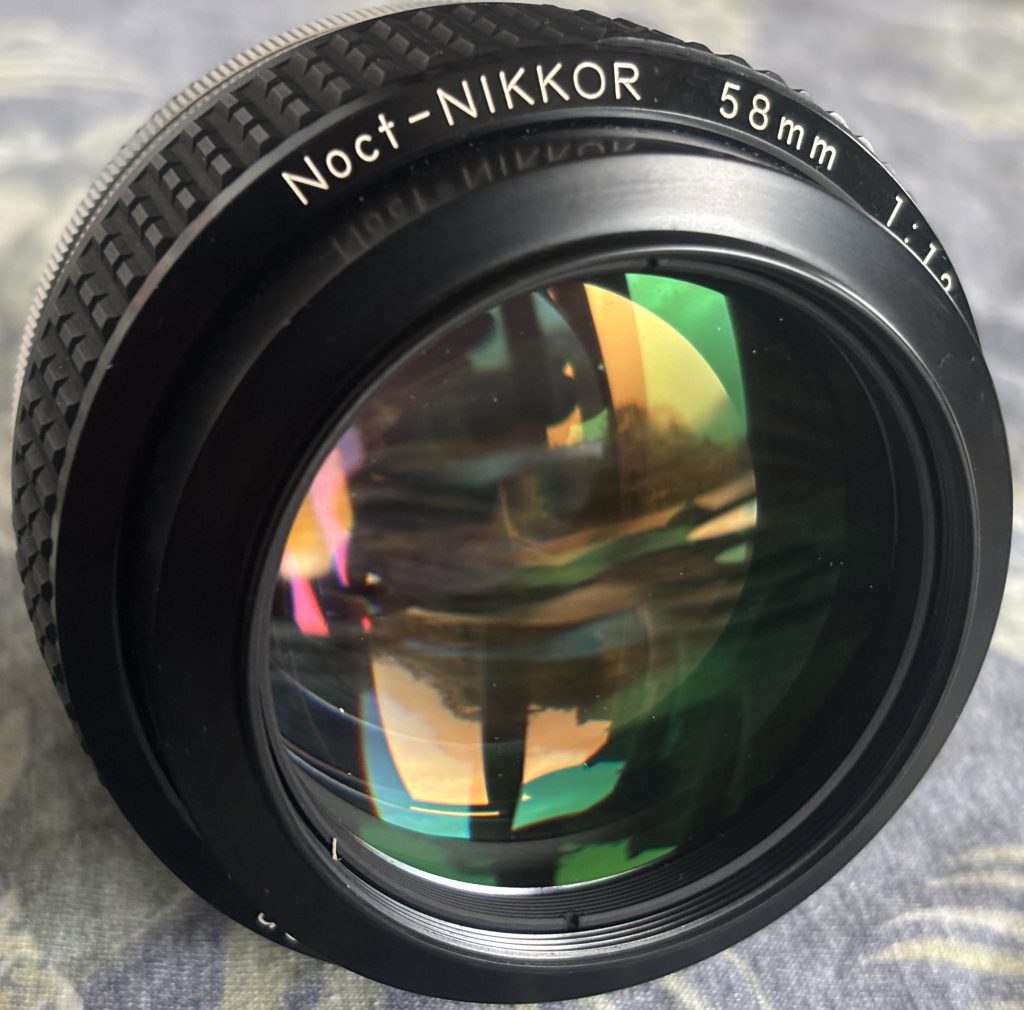
The Noct 58mm f/1.2 is a purpose-built, character lens: extraordinary center rendering and one of the best historical solutions to sagittal-coma flare, paired with very smooth, flattering bokeh — but it demands respect. On modern digital sensors it rewards careful technique (precise MF, stopping down when you need uniform sharpness) and modern tools (live-view magnification, focus peaking) make it far more usable. If you want a unique “wide-open” look for portraits and low-light moods, the Noct is still hard to beat; if you need corner-to-corner clinical sharpness at f/1.2 for landscapes or architecture, this isn’t the lens for that job.
What Nikon designed this lens to solve
The Noct was created to solve a specific optical problem: sagittal coma flare in wide-aperture “normal” lenses (how point lights smear and turn into comets off-axis). Nikon’s design priorities were to perform exceptionally at maximum aperture for night and low-light shooting — not to chase modern corner-to-corner micro-resolution at every aperture. That heritage explains the lens’s soul: beautiful wide-open rendering and point-light control rather than “evenness” across the frame at f/1.2.
Build, ergonomics, and focusing
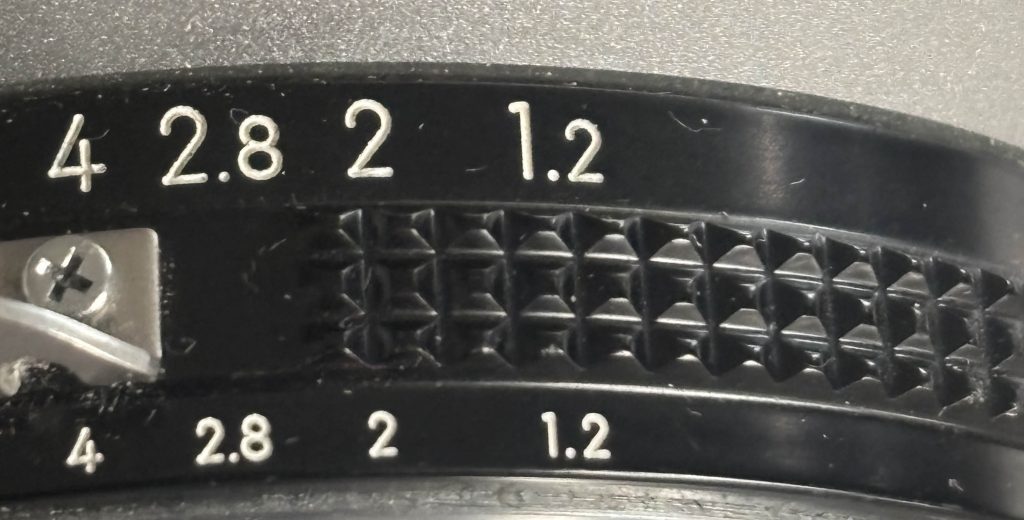
Build: Classic all-metal Nikon Ai/AI-S construction — solid, compact, with engraved markings and a tactile aperture ring. Feels like a precision tool.
Focus: Manual focus only. At f/1.2 the depth of field is wafer-thin; tiny focus errors are punished. On mirrorless bodies use focus-peaking and magnified live view — these modern tools make the Noct usable for critical wide-open work. If you plan to zone-focus or shoot moving subjects, the lens is a poor fit unless you’re very practiced.
Optical performance
Center: Very strong. The Noct’s centre performance wide open is unusually good for a vintage f/1.2; it produces high perceived sharpness and contrast when perfectly focused. This is consistent across modern tests.
Midframe & corners: The outer field lags at f/1.2. Expect softness and lower micro-contrast towards the edges at infinity focus; stopping down improves it dramatically, with most reviewers finding the lens “most comfortable” between f/2 and f/5.6 for balanced frame performance. If you need edge-to-edge sharpness on a high-resolution mirrorless sensor, anticipate stopping down.
Practical takeaway: center shots wide open = magical; wide scenes at f/1.2 = mixed results unless you stop down.
Bokeh and rendering
This is where the Noct shines emotionally: buttery, smooth out-of-focus transitions and pleasing highlight shapes from its blade geometry. Reviewers consistently praise its “non-busy” bokeh and subject separation that flatters skin and portraits. Expect rounded, painterly highlights without aggressive onion-ringing in most situations. If your aim is subject isolation and a classic portrait look, the Noct delivers.
Coma, point-light handling, and night use
The Noct was explicitly tuned to minimize sagittal coma flare, so point lights in the corners (street lights, stars) behave far better than most “normal” lenses wide open — fewer comet tails, more consistent discs. For night street photography and low-light environmental portraits, that unique coma control is a major reason to reach for the Noct.
Chromatic aberration & vignetting
Axial/Lateral CA: Longitudinal chromatic aberration (color fringing in front/behind focus) is noticeable at very wide apertures; lateral CA in the outer frame is more pronounced on high-pixel sensors. Most reviews show CA becoming much more manageable by f/2.8–f/4.
Vignetting: Expect noticeable fall-off at f/1.2 — often a stop or two in the corners at infinity focus. Closer focusing distances reduce apparent vignetting, and stopping down tames it.
Practical tip: shoot RAW and use targeted CA removal + profile vignette correction (or use it creatively — the vignetting can be flattering on portraits).
How it behaves on modern mirrorless / high-MP bodies
Adapted to AF bodies (via FTZ or other adapters) or used with adapters on Sony/Canon mirrorless, the Noct shows both its strengths and weaknesses more clearly:
Strength: centre micro-rendering and bokeh are preserved; coma control remains a standout advantage for night work.
Weakness: higher-resolution sensors reveal the midframe and corner weaknesses and CA more readily; some reviewers recommend stopping down more quickly than you might have with an older film era body.
Practical workflow: use magnified live view, focus peaking, and consider slight back-button magnify + shutter-half-press preview to ensure micro-focus accuracy.
Recommended uses
Environmental and studio portraits where you can control focus and want creamy backgrounds.
Street / night work with point lights — the Noct’s coma control makes it exceptional here.
Creative wide-open photography where center pop and subject separation are priorities.
Avoid: landscapes or architectural work where corner resolution at wide apertures is critical.
How to get the best images from the Noct
Use focus-magnification and focus peaking on mirrorless bodies.
If subject distance > ~10–15 m (infinity/landscape), stop down to f/4–f/8 for better edge performance.
For portraits where you want strong subject separation, f/1.2–f/1.8 is spectacular — just nail focus.
Shoot RAW and apply modest CA correction and vignette control in post; preserve the bokeh and micro-contrast.
When shooting night points, frame to use the Noct’s coma strength — corner lights will behave nicely compared to other “normal” lenses.
Quirks
The lens rewards technique: minor focus errors are visible at f/1.2.
It has a personality — micro-contrast and “pop” vs modern clinical contrast can vary depending on sensor and processing.
Some testers report a focus shift or slightly different micro-behavior depending on camera (film vs high-MP digital), so check your pairing.
Who should buy this?
Buy it if you are looking for a unique portrait/night lens with classic rendering and you enjoy manual focus craftsmanship. Don’t buy it if you need modern AF convenience or clinical, pixel-peeping corner sharpness wide open for technical landscape or studio product work. It’s a specialty tool that rewards respect and technique.
Comparing to modern alternatives
Compared with newer 50–60mm fast lenses (and Nikon’s own modern Noct Z variants), the vintage Noct is less “even” across the frame but has a distinctive personality that many modern ultra-fast lenses try to mimic. If you want perfectly neutral, ultra-sharp wide-open modern optics, look to contemporary designs; if you want classic character, silky bokeh, and the legendary night performance, the vintage Noct is a soul-fulfiling choice.
Further reading
Highly recommended if you want to dive deeper: Photography Life (detailed optical measurements and field tests), Phillip Reeve (recent mirrorless/42–61MP body tests), Moment (coma and night testing), Ming Thein (practical imaging notes), The Cine Lens and Steve Huff (character and sample galleries).
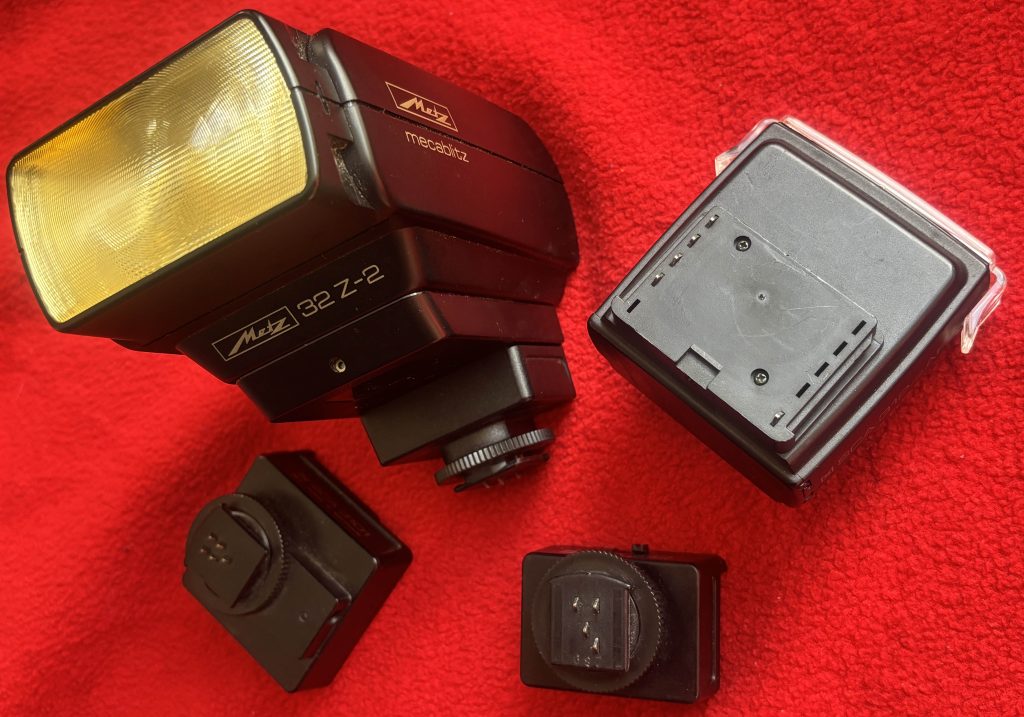
This guide explains what the Metz SCA system is, the difference between its main versions, how to select and install SCA adapters, how to use TTL and manual flash control, high-speed sync, off-camera options, and common troubleshooting tips.
1. What the SCA system does
Metz designed the System Connector Adapter (SCA) to make their flashes adaptable across many camera brands. Instead of buying a different flash for each brand, you pair a Metz flash with an SCA adapter that “translates” the electrical contacts and control signals. That way, a single Metz unit can work with Nikon, Canon, Minolta, Leica, and many more — while still providing TTL or other camera-specific functions.
2. Main SCA families
SCA 300 – the original series, developed during the film SLR era. These adapters allow TTL and basic communication but don’t support newer digital protocols.
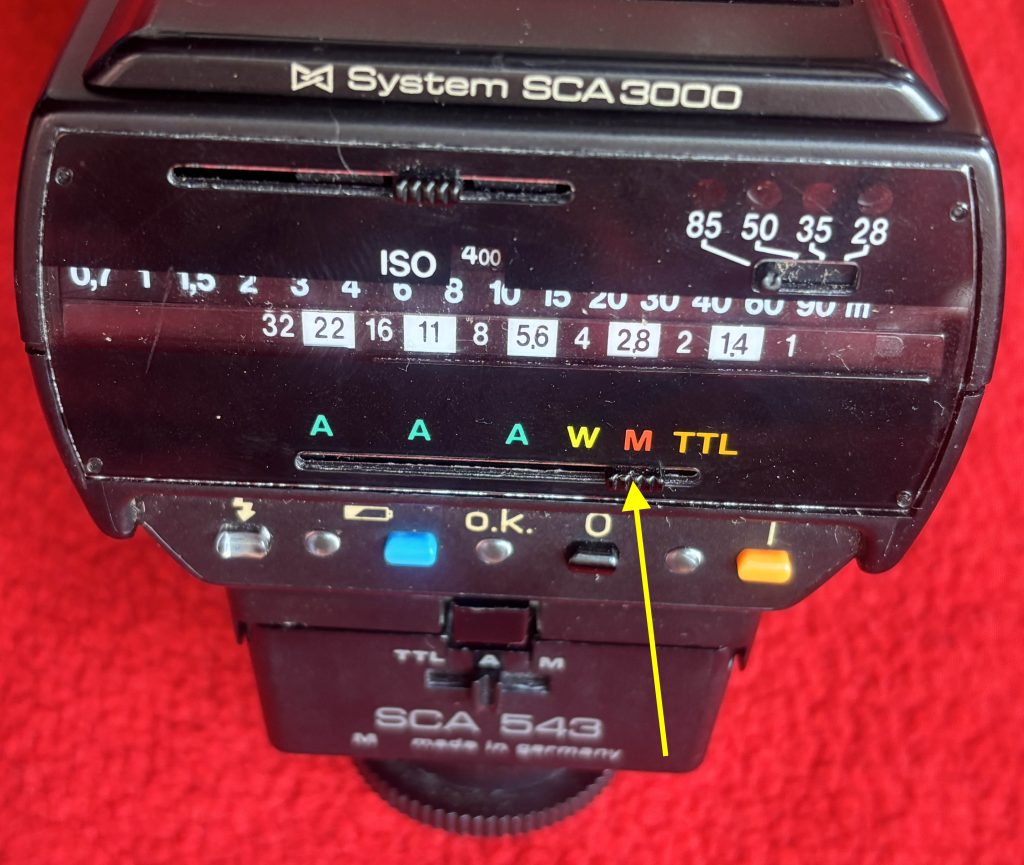
SCA 3000 – the updated family for the digital age. These modules handle modern TTL systems (E-TTL, i-TTL, etc.) and sometimes add features like high-speed sync. Versions are marked M3, M5, M6, etc., with higher numbers usually indicating newer firmware.
Other SCA branches – Metz also released other system connectors (e.g., SCA-500) for special applications, but the bulk of modern use involves the 3000 series.
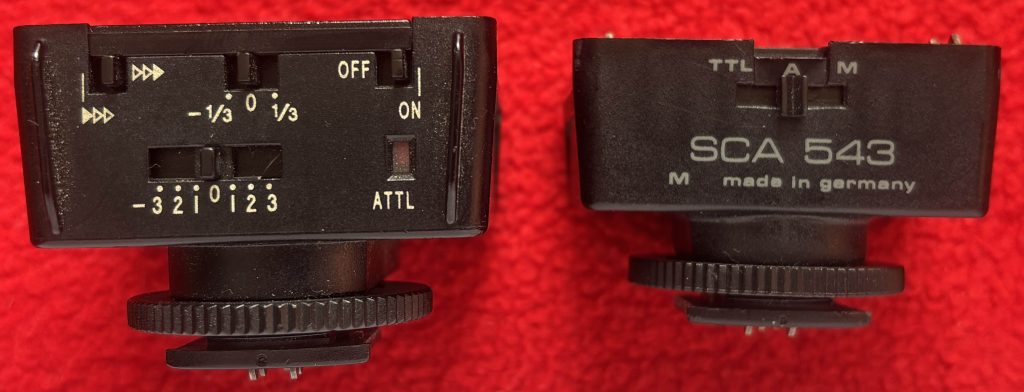
3. Choosing the right adapter
Check your flash model (e.g., 54 MZ-4i, 58 AF-1).
Look up Metz’s compatibility charts — these list which adapter matches which camera brand and model, plus what features will work.
Pay attention to version codes — if your camera is recent, you may need an adapter with updated firmware (e.g., SCA 3102 M6 instead of M3).
4. Attaching the system
Switch off both flash and camera before connecting.
Slide the adapter into the flash’s detachable base until it clicks.
Mount the assembled unit on the camera hot shoe and lock it in place.
Power up the camera first, then the flash. On most cameras, the flash-ready indicator should appear in the viewfinder or LCD if the setup is correct.
5. TTL flash operation
With the proper adapter, your camera can control flash exposure through its native TTL system. Flash exposure compensation (FEC) is often set on the camera, though some Metz units allow adjustment on the flash itself. If exposures are slightly off, dial in a correction using the camera’s controls.
6. Manual control
Even with no adapter at all, Metz flashes can be used in manual mode. Here you choose the power output (full, 1/2, 1/4, down to 1/128) and set the zoom head as needed. Manual is the most predictable approach when working with studio lights or third-party triggers.
7. High-speed sync and sync limits
If your flash + adapter + camera all support high-speed sync, you can shoot above the camera’s normal sync speed (e.g., 1/500s).
If not, you’ll be limited to the standard X-sync speed (usually between 1/60s and 1/250s). Check the compatibility chart to confirm.
8. Off-camera options
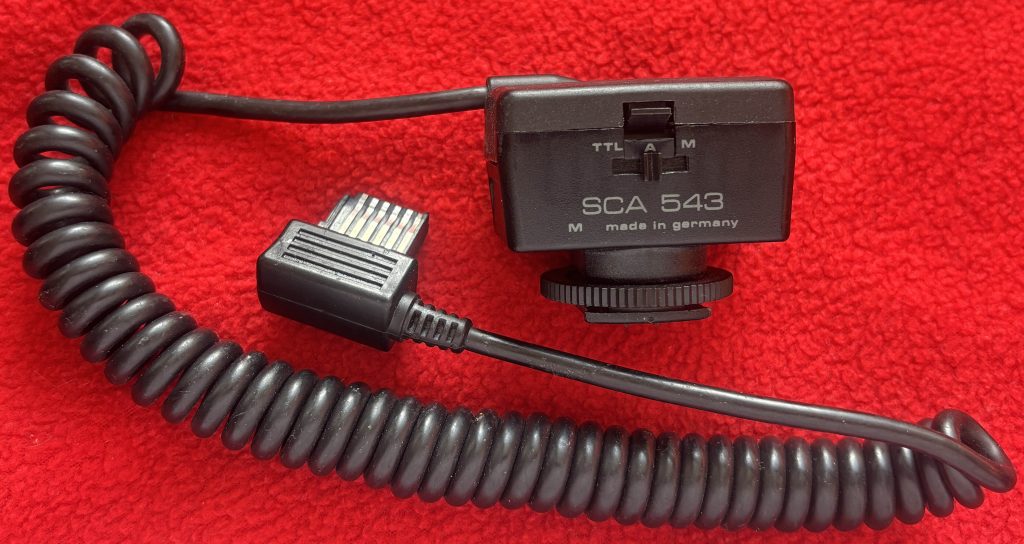
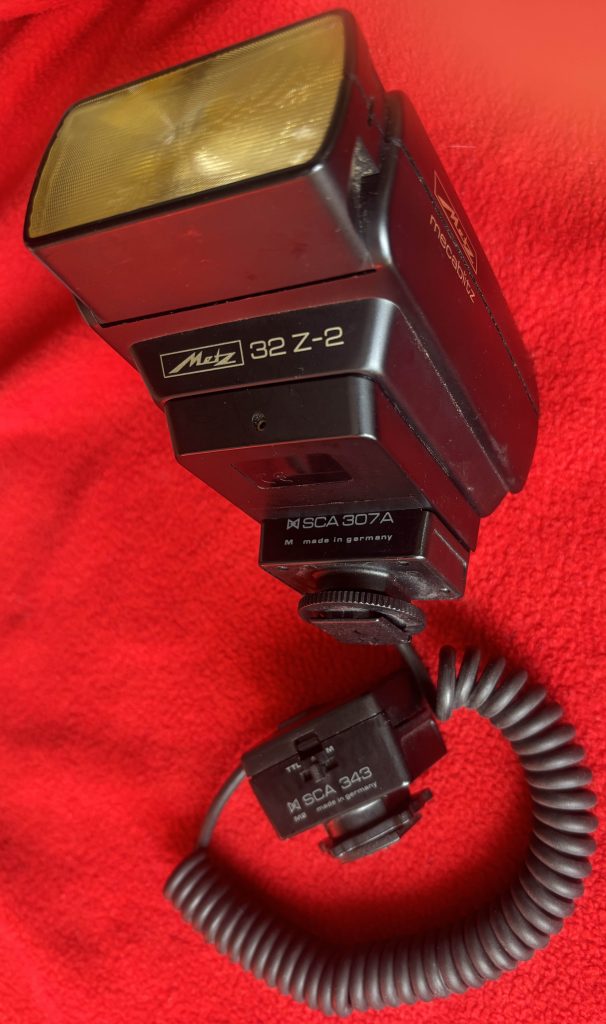
Wired: Metz made SCA extension cords so you can keep TTL communication even with the flash off-camera. One type has a plug at one end to fit Metz hammerhead flash units, the other (SCA 307A) has a male module connector on one end and a female module connector on the other and is used for all hot shoe Metz flash off camera.
Optical/radio: Many Metz flashes have an optical slave mode. For radio triggers, most photographers use them in manual mode unless the trigger system specifically supports Metz TTL (rare).
9. Troubleshooting checklist
Make sure you’re using the correct adapter family and version.
Always power down before connecting or removing modules.
Test the flash in manual mode at your camera’s sync speed to confirm the basic connection works.
Clean the contacts with a cotton bud and alcohol if the flash misfires.
Be cautious with older Metz flashes: some output higher trigger voltages that may damage modern cameras unless the SCA adapter regulates it.
10. Care and storage
Avoid stress on the camera hot shoe if you’re using a heavy Metz flash use a bracket or cable.
Keep adapters in labeled pouches so you don’t mix them up.
Don’t store the flash with batteries installed for long periods – leaking batteries will ruin the contacts inside your flashgun..
Filters are an essential part of photography and cinematography, helping control the look, tone, and accuracy of captured images. Among the many available, the 81A series filter stands out as one of the most useful warming filters for both film and digital shooters.
What Is the 81A Filter?
The 81A filter belongs to a family of warming filters designed to subtly shift the color balance of an image. Specifically, the 81A introduces a mild amber cast that counteracts overly cool or blue tones.
Filter factor: Typically around 1.2× (requiring about 1/3 stop exposure compensation).
Color temperature adjustment: Raises the effective color temperature by approximately 200 Kelvin. For example, it can correct daylight film (balanced for 5500K) when shooting in shade (around 6000–6500K).
Material: Usually made of optical glass or high-quality resin, coated to reduce reflections and flare.
In short, it gently warms up the scene without making colors appear unnatural.
Why Use the 81A Filter?
Correcting Cool Light Outdoor photography often results in cooler images, especially under open shade, overcast skies, or at high altitudes. The 81A reduces this bluish tint for a more natural, balanced look.
Enhancing Skin Tones Human skin can look washed out or pale in cool lighting. The subtle warming effect of the 81A filter adds life and warmth to skin tones, making portraits appear healthier and more flattering.
Improving Landscapes In scenic photography, the filter can make foliage appear richer and skies less stark. It gives a sense of warmth that makes landscapes feel more inviting.
Film and Digital Versatility While originally designed for film, the 81A remains relevant for digital shooters who want to achieve an in-camera look rather than relying on post-processing.
How to Use the 81A Filter
Choose the Right Size The filter comes in different diameters (e.g., 52mm, 58mm, 77mm) to fit your lens. Make sure you match the filter thread size, or use a step-up ring if needed.
Mounting the Filter Simply screw the filter onto the front of your lens. Because the 81A is subtle, it can be left on the lens as a protective cover without drastically altering your images.
Exposure Compensation Since the filter factor is low (about +0.3 stops), most modern cameras automatically adjust exposure. For manual film cameras, you may need to open up the aperture slightly or slow down the shutter speed.
Combining Filters The 81A can be used alongside polarizers, neutral density filters, or other creative filters. Just be mindful of stacking too many, as this can introduce vignetting or reduce image sharpness.
Practical Scenarios
Portraits outdoors: Adds a healthy glow to skin tones.
Mountain or seaside photography: Corrects excessive blue tones.
Travel photography: Provides a consistent warmth across varied lighting conditions.
81A vs. Other Warming Filters
81B and 81C: Slightly stronger warming effects than the 81A, useful in colder light or when a more pronounced warmth is desired.
Skylight (1A) filter: Similar in concept but less warming than the 81A, often used just for lens protection.
Conclusion
The 81A series filter may seem subtle, but its effect is powerful in the right situations. By gently warming tones, it improves color balance, enhances skin, and gives outdoor shots a natural vibrancy. Whether you’re a film purist or a digital photographer looking for an in-camera aesthetic, the 81A remains a classic, reliable tool in the filter kit.
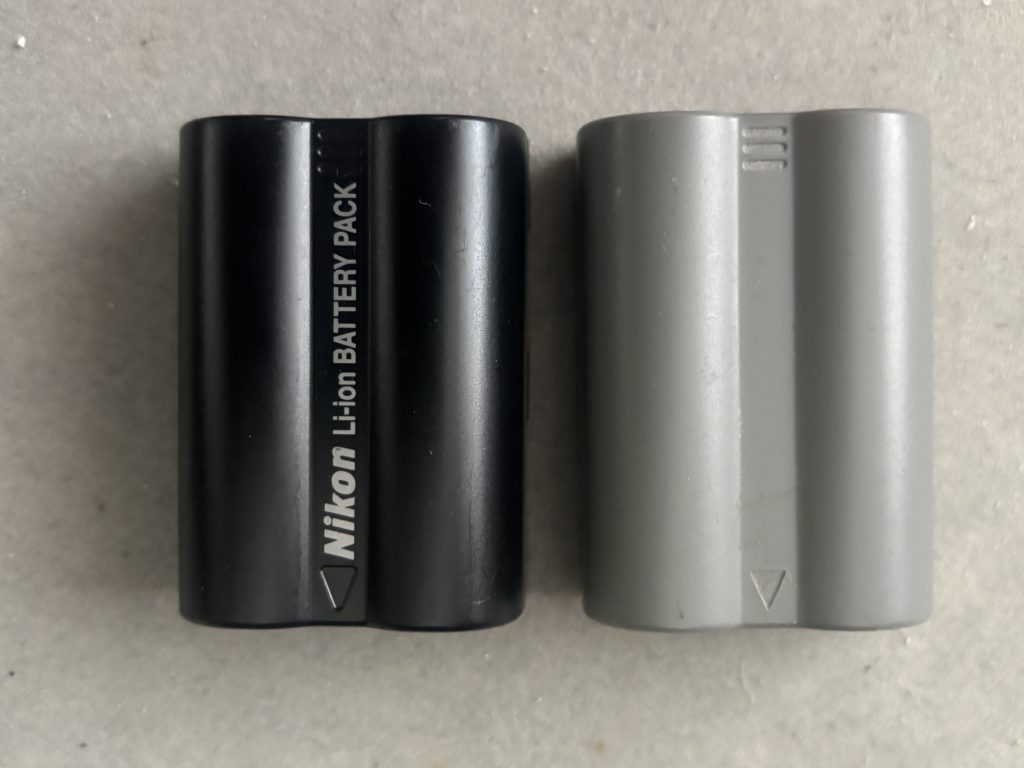
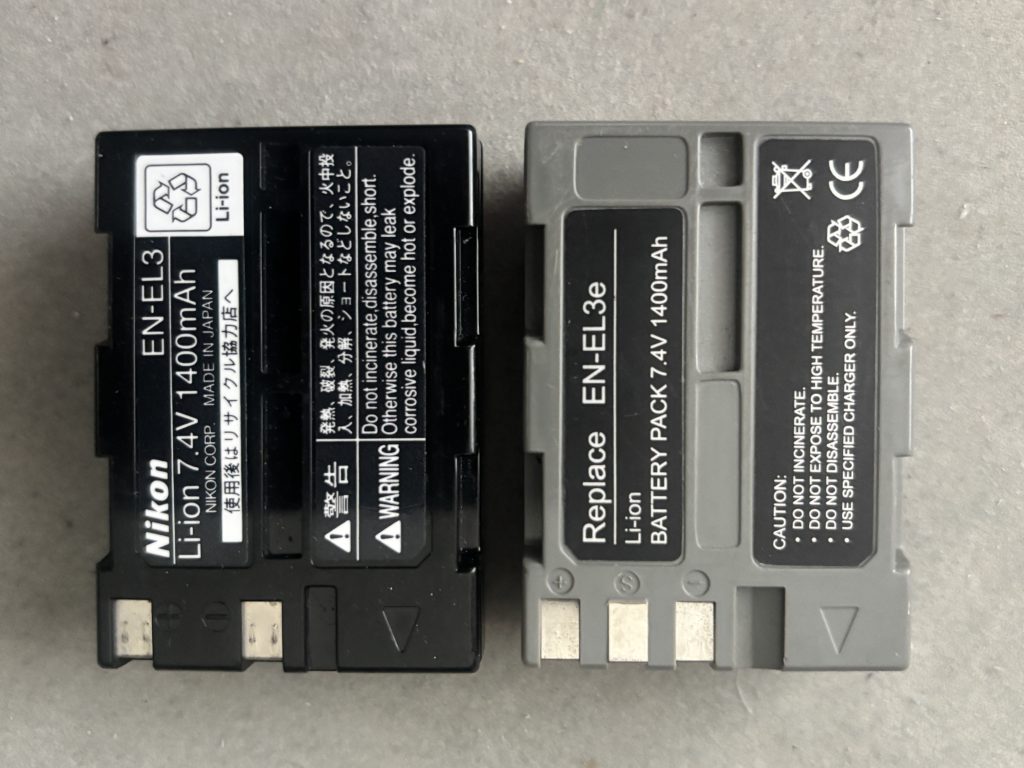
There is some confusion about which battery fits which Nikon camera and which charger you should use when considering the Nikon EN-EL3 (also supplied as the EN-ENL3a and Nikon EN-EL3e. This is not surprising as both batteries look pretty much the same, dimensionally at least. They’re both also Li-ion 7.4V 1400mAh. The real difference is the Nikon EN-EL3e has three contacts while the Nikon EN-EL3/EN-EL3a has just two.
The third contact on the EN-EL3e battery sits in the middle of the two contacts found on the EN-EL3. This third contact was added to provide additional information for Nikon’s D200 Digital SLR. The battery will however fit and work in older cameras. But the older two contact EN-EL3 battery will not go fully into the more modern three contact cameras as the camera’s third internal contact will prevent the battery from slipping all the way into the housing.
When it comes to the battery charger the MH-18 / MH-18a will charge both the EN-EH3 and the EN-EH3e batteries
Cameras that take the EN-EL3e battery Nikon D50 Nikon D70 Nikon D70s Nikon D80 Nikon D90 Nikon D100 Nikon D200 Nikon D300 Nikon D300S Nikon D700
Cameras that take the EN-EL3 / EN-EL3a battery Nikon D50 Nikon D70 Nikon D70s Nikon D100