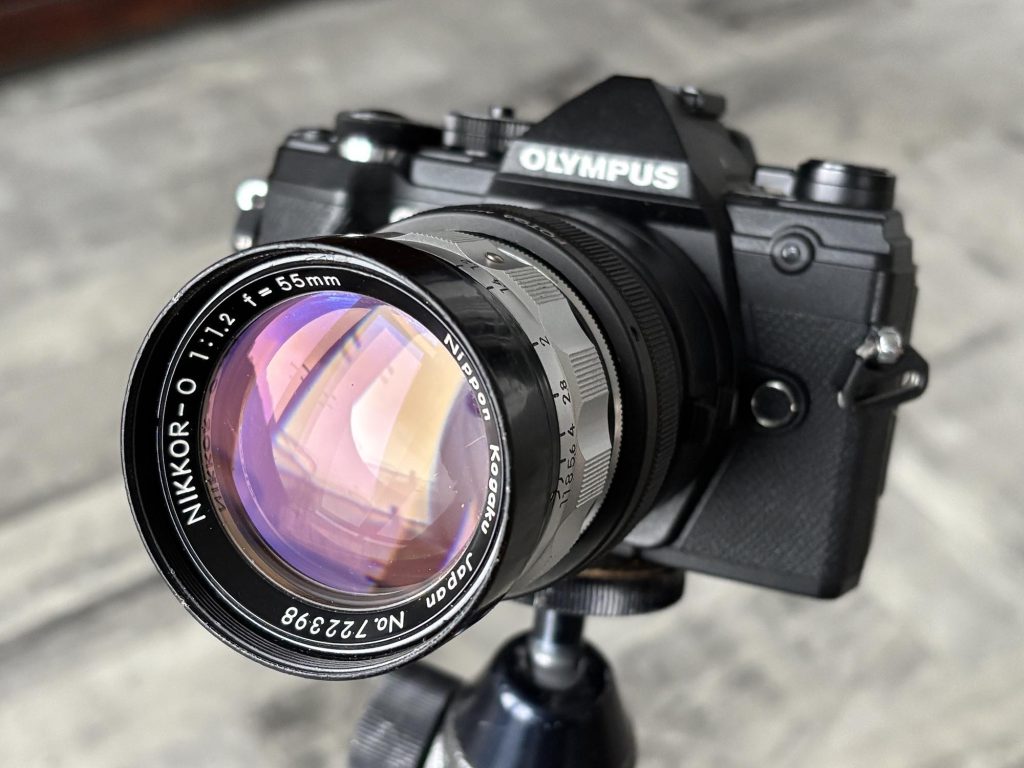
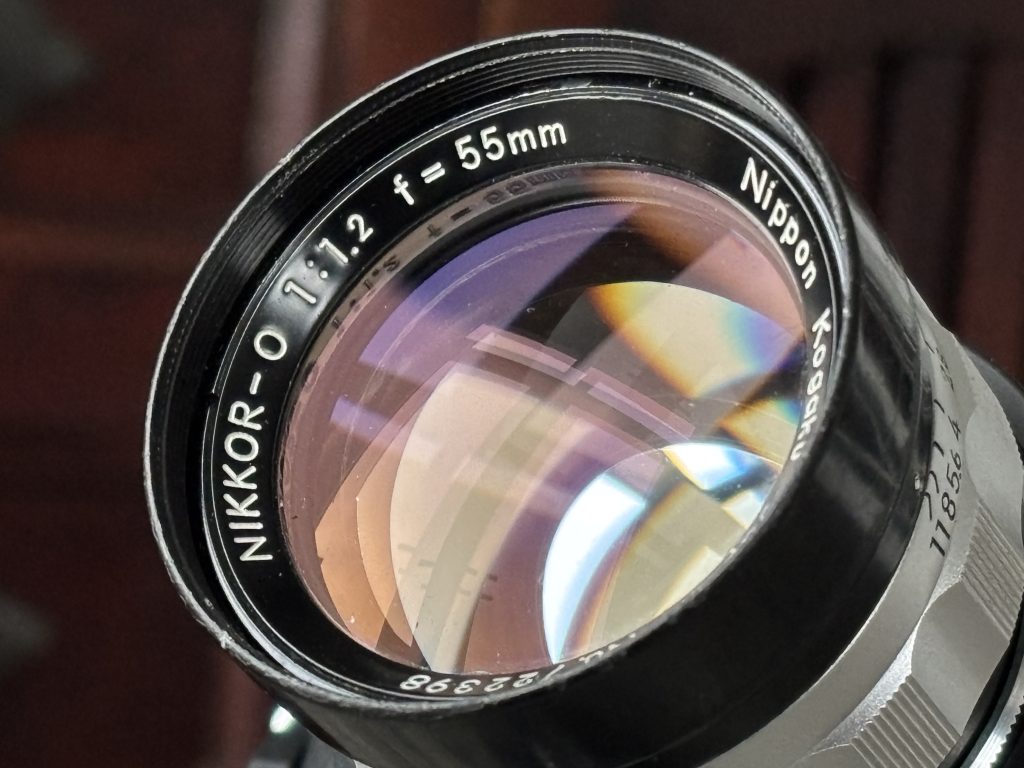
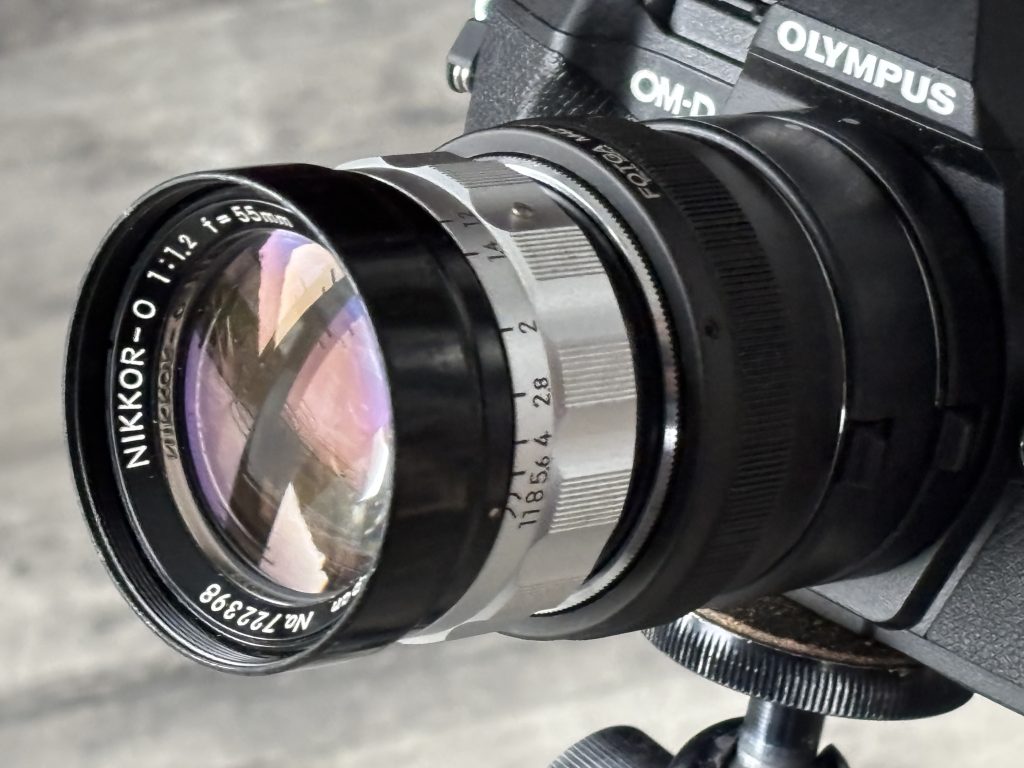
The Nikkor-O 55mm f/1.2 is one of Nikon’s most character-rich standard lenses. Produced in the late 1960s by Nippon Kagaku, it represents a transitional period when ultra-fast lenses were engineering statements as much as photographic tools. Today, it’s rare, collectible, and beloved for its distinctive rendering rather than clinical perfection.
This guide covers its history, optical character, handling, buying considerations, and how to get the best from it in modern use.
Historical Context
In the 1960s, pushing aperture boundaries was a prestige race among camera manufacturers. Nikon introduced the 55mm f/1.2 before the more common 50mm f/1.2 designs became standard. The “O” designation refers to its 7-element optical formula (“O” indicating seven elements in Nikon’s naming convention of the era).
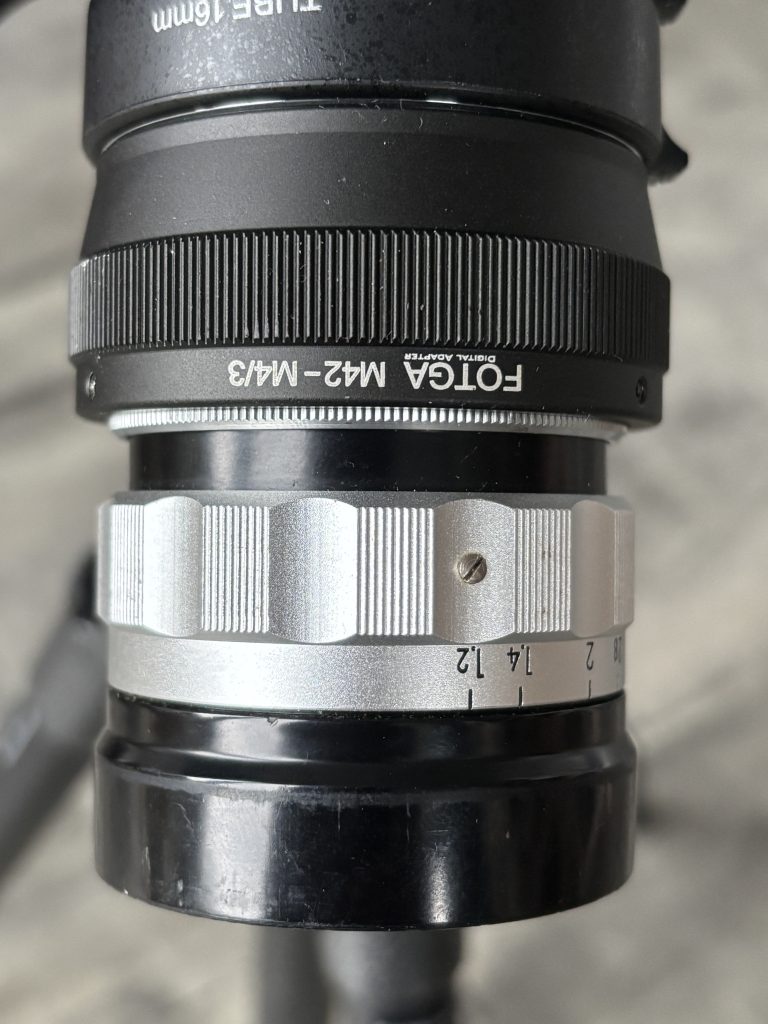
The lens is not designed to be mounted on a standard Nikon AI Mount SLR, and has a Leica M39 thread mount. You can buy an M39-to-Nikon F-mount adapter to mount the lens on a Nikon SLR.
The one I have for sale doesn’t have a thread so I’ve converted it to Micro 4/3rds for use on my Olympus E-M5III, using an adaptor previously used to convert M42 to M 4/3.
Production numbers were relatively low compared to later 50mm f/1.2 lenses, contributing to its rarity.
This is where the magic—and quirks—live: • Dreamy glow from spherical aberration • Lower contrast • Gentle highlight bloom • Swirly or nervous bokeh depending on distance
It is not clinically sharp at f/1.2. Instead, it produces an almost cinematic softness that flatters portraits and night scenes.
Stopped Down (f/2 – f/2.8) • Contrast increases dramatically • Sharpness improves significantly • Glow reduces but character remains
At f/2.8 and beyond, it behaves like a strong vintage standard lens with rich tonal rendering.
What Makes It Special
1. Transitional Rendering
Unlike modern ultra-fast lenses that aim for perfection wide open, this lens embraces imperfection. It’s expressive rather than analytical.
2. 55mm Focal Length
The slightly longer-than-50mm perspective: • Adds subtle compression • Feels natural for portraits • Gives a distinct look compared to standard 50mm lenses
3. Build Quality
Heavy, solid brass construction Long, smooth focus throw Deep mechanical feel typical of late-60s Nikon craftsmanship
Compatibility Guide
Because most copies are Pre-AI, mounting them on modern Nikon DSLRs without modification can damage the camera’s aperture indexing tab.
Because this lens is rare, condition matters greatly.
What to Check:
1. Fungus & Haze Fast vintage lenses are prone to internal haze due to aging coatings.
2. Oil on Aperture Blades Check for smooth, snappy aperture action.
3. Serial Numbers Early and late batches show minor cosmetic differences, but optical formula remains consistent.
Price Range
Prices vary depending on: • Condition • AI conversion • Cosmetic wear • Market demand
Expect it to command a premium over standard vintage 50mm f/1.2 lenses due to rarity.
Shooting Tips
1. Embrace the Glow
Don’t fight the softness wide open. Use it intentionally.
2. Control Flare
It can flare dramatically. Use: • A deep lens hood • Careful light positioning
3. Focus Carefully
At f/1.2, depth of field is razor thin. Use: • Focus magnification (mirrorless) • Split-prism screens (film bodies)
4. Black & White Magic
The tonal transitions at f/1.2 are particularly beautiful in monochrome conversions.
How It Compares to Later Nikon f/1.2 Lenses
Compared to later 50mm f/1.2 designs: • More glow • Less correction • More vintage signature • Slightly more unique focal perspective
It feels less engineered for precision and more for character.
Collector Value
The Nikkor-O 55mm f/1.2 is desirable because: • It represents Nikon’s early ultra-fast design philosophy • It has limited production numbers • It offers rendering not easily replicated by modern lenses
Clean, original-condition copies are increasingly hard to find.
Who Should Buy It?
Buy this lens if you:
✔ Love vintage rendering ✔ Shoot portraits or atmospheric scenes ✔ Use mirrorless cameras ✔ Appreciate mechanical craftsmanship ✔ Want something rarer than a standard 50mm f/1.2
Avoid it if you:
✘ Need edge-to-edge sharpness at f/1.2 ✘ Prefer modern contrast and coatings ✘ Don’t want to deal with manual focus
Final Thoughts
The Nikkor-O 55mm f/1.2 is not about technical perfection. It’s about atmosphere, mood, and character. It’s a lens from an era when speed was ambitious and flaws were part of the signature.
In a world of optically flawless modern glass, this lens stands out precisely because it isn’t flawless — and that’s why it remains one of Nikon’s most intriguing rare classics.
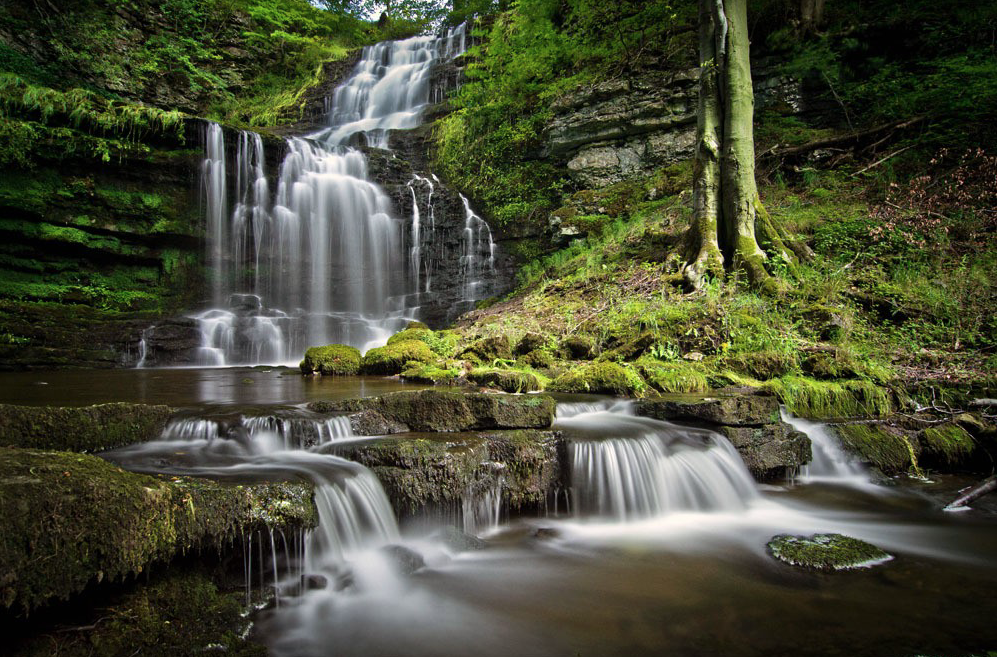
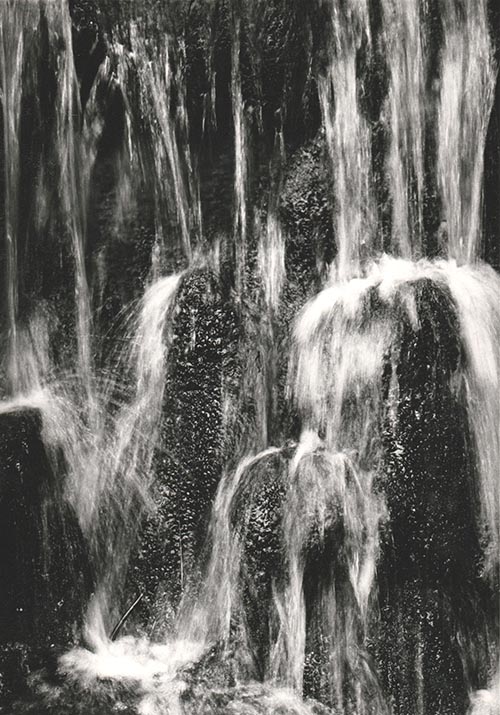
Shutter speed is the single most critical variable in waterfall photography. It determines not just exposure, but the emotion of the water.
Most guides offer a binary choice: “freeze” the water or “blur” it. This guide focuses on the Texture Spectrum – finding the specific speed that matches the personality of the waterfall you are photographing.
Waterfall Texture Spectrum
Instead of guessing, use this spectrum to decide what story you want to tell.
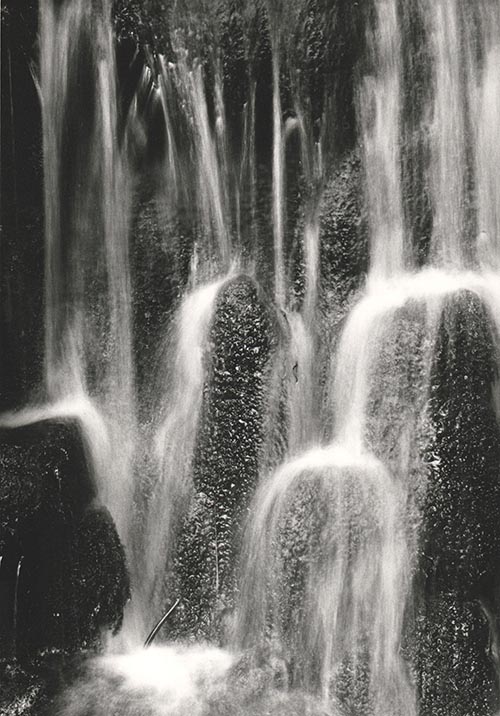
1 : The “Power & Chaos” Zone (1/500s or faster)
The Look: Violent, crisp, and detailed. Every droplet is frozen in mid-air.
Best For: Massive, roaring waterfalls where you want to convey danger or raw power.
Technique:
Mode: Shutter Priority (Tv or S).
ISO: You may need to bump ISO to 400 or 800 to maintain this speed in shady glens.
Burst Mode: Fire a rapid burst. Since water moves chaotically, one frame will often have a better “shape” of splash than the others.
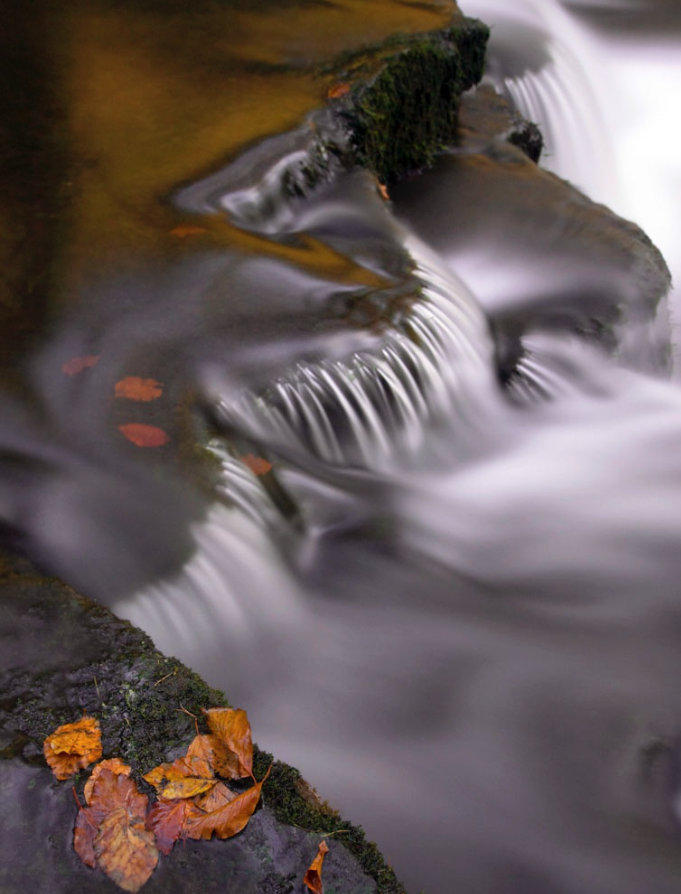
2 : The “Structured Flow” Zone (1/15s – 1/2s)
The Look: This is the underused “Sweet Spot.” The water has motion and direction, but it retains texture. It looks like “stringy muscle” rather than “white milk.” It looks real, but slightly dreamlike.
Best For: Waterfalls with interesting rock formations behind the water, or multi-tiered cascades.
Technique:
Stability: A tripod is mandatory here. Hand-holding will result in a blurry landscape, not just blurry water.
Filter: You usually do not need a heavy Neutral Density (ND) filter here; a polarizer is often enough to cut the glare and slow the shutter just enough.
3 : The “Ethereal Silk” Zone (1s – 5s+)
The Look: The classic “calendar” look. The water becomes a solid, smooth white sheet. It creates a sense of peace and abstraction.
Best For: Thin, spindly waterfalls or scenes where you want to simplify a messy composition.
Technique:
ND Filter: Essential. You cannot achieve a 2-second exposure in daylight without blocking light. A 3-stop (ND8) or 6-stop (ND64) filter is standard.
Cover the Viewfinder: On DSLR cameras, light can leak in through the viewfinder during long exposures and ruin the shot. Cover it with your thumb or the provided cap.
Pro Tip If the water is bright white foam, it will lose detail (blow out) very quickly. Underexpose your image by -0.3 or -0.7 EV to protect the highlights in the water.
The Math of Flow
The speed of the water dictates the shutter speed required.
Fast rushing water needs a faster shutter speed to blur (because it moves across the frame quickly).
Slow trickling water needs a slower shutter speed to show any motion at all.
If you want to calculate the perfect blur, a good rule of thumb for the “Structured Flow” look is: T=1 / 2 x V
Where T is shutter speed and V is the estimated velocity of water in feet per second. (e.g., if water moves at 15 fps, try 1/30th of a second).
The “Pocket Long Exposure” (Using a Phone) You don’t need a DSLR to drag the shutter. Modern phones have computational photography tricks that simulate long exposures perfectly without a tripod.
Method A: The iPhone “Live Photo” Hack (Easiest) This is a hidden feature that mimics a 3-second shutter speed. 1. Turn on Live Photos (the concentric circle icon in the camera app). 2. Take the shot. Hold as still as possible, but a tripod isn’t strictly necessary. 3. Open the Photo in your gallery. 4. Tap the “Live” menu (top left corner) and select “Long Exposure”. The phone blends the video frames from the Live Photo into a single silky image, effectively creating a ~3-second exposure.
Method B: Android “Pro Mode” (Best Quality) Most Android flagships (Samsung S-series, Pixel, etc.) have a Pro/Manual mode. 1. Open Camera > More > Pro Mode. 2. Set ISO to 50 (or the lowest possible number). 3. Adjust Shutter Speed: Dial it to 1/10 or 1/4. 4. The “Sunglass Hack”: If the image is completely white (overexposed), hold your sunglasses over the phone lens. This acts as a makeshift Neutral Density filter, cutting the light and allowing you to use slower speeds.
Method C: Third-Party Apps If your native camera app is limited, use dedicated apps that “stack” images to create blur. • iOS: Spectre Camera (uses AI to stabilize and blur). • Android: Camera FV-5 Lite or Motion Cam.
Quick Reference
Effect Desired
Shutter Speed
ND Filter needed
Best For
Freeze
1/500s+
No
Raging power
Texture
1/15sec-1/2sec
Polariser is enough
Rock detail
Silky Smooth
1-5sec
ND8 or ND64
Calm messy scenes
Abstract Mist
10s+
ND1000 (Big Stopper)
Minimalist Art
Essential Gear for Waterfall Photography
While you can take a snapshot with anything, controlling shutter speed requires specific tools to manage light and stability.
1 : Light Control
This is the most critical section. You cannot achieve slow shutter speeds during the day without these.
• Circular Polarizer (CPL) – The “Must-Have”:
• Why: It cuts the white glare off wet rocks and leaves, letting the deep green and stone colors shine through. It also acts as a weak Neutral Density filter, reducing light by about 1.5 to 2 stops (perfect for the “Structured Flow” look).
• 3-Stop ND Filter (ND8):
• Why: Perfect for shady glens or overcast days. It lets you slow the shutter to around 1/2s or 1s without making the image too dark to compose.
• 6-Stop ND Filter (ND64):
• Why: Essential for brighter conditions or when you want that long, 5s to 10s “silky” exposure.
• Step-Up Rings:
• Tip: Instead of buying filters for every lens size, buy filters for your largest lens (e.g., 77mm or 82mm) and buy cheap step-up rings to fit them onto your smaller lenses.
2 : Stability
Waterfalls are often found in dark canyons or deep woods, meaning exposure times are long. Hand-holding is rarely an option.
• Tripod (Low-Angle Capable):
• Look for a tripod where the center column can be removed or inverted. You often want to shoot from very low (1 foot off the ground) to include foreground rocks in the composition.
• Remote Shutter Release (or App):
• Pressing the camera button introduces vibration. Use a cable release, a wireless remote, or the 2-second self-timer built into your camera.
• L-Bracket (Optional but Recommended):
• Allows you to switch your camera from Landscape to Portrait orientation without flopping the tripod head over to the side (which shifts your centre of gravity and reduces stability).
3 : Spray Management
Waterfalls generate mist. Mist ruins sharpness.
• Microfiber Cloths (Many of them):
• Bring at least 3-4 dry cloths. Once one gets damp from spray, it just smears water across the lens rather than removing it.
• Rocket Blower:
• Use this to blow large droplets off the glass before wiping. Wiping a dusty lens with a cloth can scratch the coating; blowing it off first is safer.
• Shower Cap or Rain Sleeve:
• A cheap hotel shower cap is the perfect emergency rain cover for your camera body if the mist is heavy.
4 : Which Lens
• Wide Angle Zoom (e.g., 16-35mm):
• For capturing the grand scene and emphasizing foreground rocks.
• Telephoto Zoom (e.g., 70-200mm):
• Underrated: Use this to zoom in tight on specific sections of the fall for abstract, intimate textures (isolating just the water and a single fern, for example).
5 : Personal Safety & Comfort
• Good Grip Boots: Wet rocks are treacherous.
• Towel: For drying your hands (or your knees if you are kneeling in mud).
Filters are an essential part of photography and cinematography, helping control the look, tone, and accuracy of captured images. Among the many available, the 81A series filter stands out as one of the most useful warming filters for both film and digital shooters.
What Is the 81A Filter?
The 81A filter belongs to a family of warming filters designed to subtly shift the color balance of an image. Specifically, the 81A introduces a mild amber cast that counteracts overly cool or blue tones.
Filter factor: Typically around 1.2× (requiring about 1/3 stop exposure compensation).
Color temperature adjustment: Raises the effective color temperature by approximately 200 Kelvin. For example, it can correct daylight film (balanced for 5500K) when shooting in shade (around 6000–6500K).
Material: Usually made of optical glass or high-quality resin, coated to reduce reflections and flare.
In short, it gently warms up the scene without making colors appear unnatural.
Why Use the 81A Filter?
Correcting Cool Light Outdoor photography often results in cooler images, especially under open shade, overcast skies, or at high altitudes. The 81A reduces this bluish tint for a more natural, balanced look.
Enhancing Skin Tones Human skin can look washed out or pale in cool lighting. The subtle warming effect of the 81A filter adds life and warmth to skin tones, making portraits appear healthier and more flattering.
Improving Landscapes In scenic photography, the filter can make foliage appear richer and skies less stark. It gives a sense of warmth that makes landscapes feel more inviting.
Film and Digital Versatility While originally designed for film, the 81A remains relevant for digital shooters who want to achieve an in-camera look rather than relying on post-processing.
How to Use the 81A Filter
Choose the Right Size The filter comes in different diameters (e.g., 52mm, 58mm, 77mm) to fit your lens. Make sure you match the filter thread size, or use a step-up ring if needed.
Mounting the Filter Simply screw the filter onto the front of your lens. Because the 81A is subtle, it can be left on the lens as a protective cover without drastically altering your images.
Exposure Compensation Since the filter factor is low (about +0.3 stops), most modern cameras automatically adjust exposure. For manual film cameras, you may need to open up the aperture slightly or slow down the shutter speed.
Combining Filters The 81A can be used alongside polarizers, neutral density filters, or other creative filters. Just be mindful of stacking too many, as this can introduce vignetting or reduce image sharpness.
Practical Scenarios
Portraits outdoors: Adds a healthy glow to skin tones.
Mountain or seaside photography: Corrects excessive blue tones.
Travel photography: Provides a consistent warmth across varied lighting conditions.
81A vs. Other Warming Filters
81B and 81C: Slightly stronger warming effects than the 81A, useful in colder light or when a more pronounced warmth is desired.
Skylight (1A) filter: Similar in concept but less warming than the 81A, often used just for lens protection.
Conclusion
The 81A series filter may seem subtle, but its effect is powerful in the right situations. By gently warming tones, it improves color balance, enhances skin, and gives outdoor shots a natural vibrancy. Whether you’re a film purist or a digital photographer looking for an in-camera aesthetic, the 81A remains a classic, reliable tool in the filter kit.
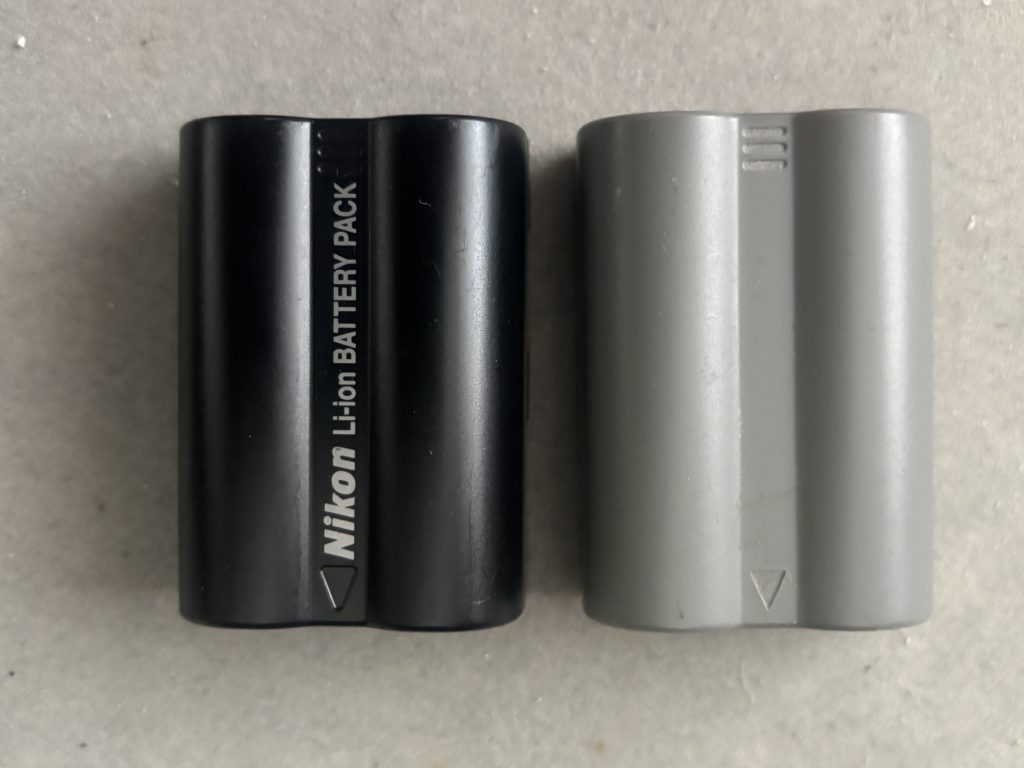
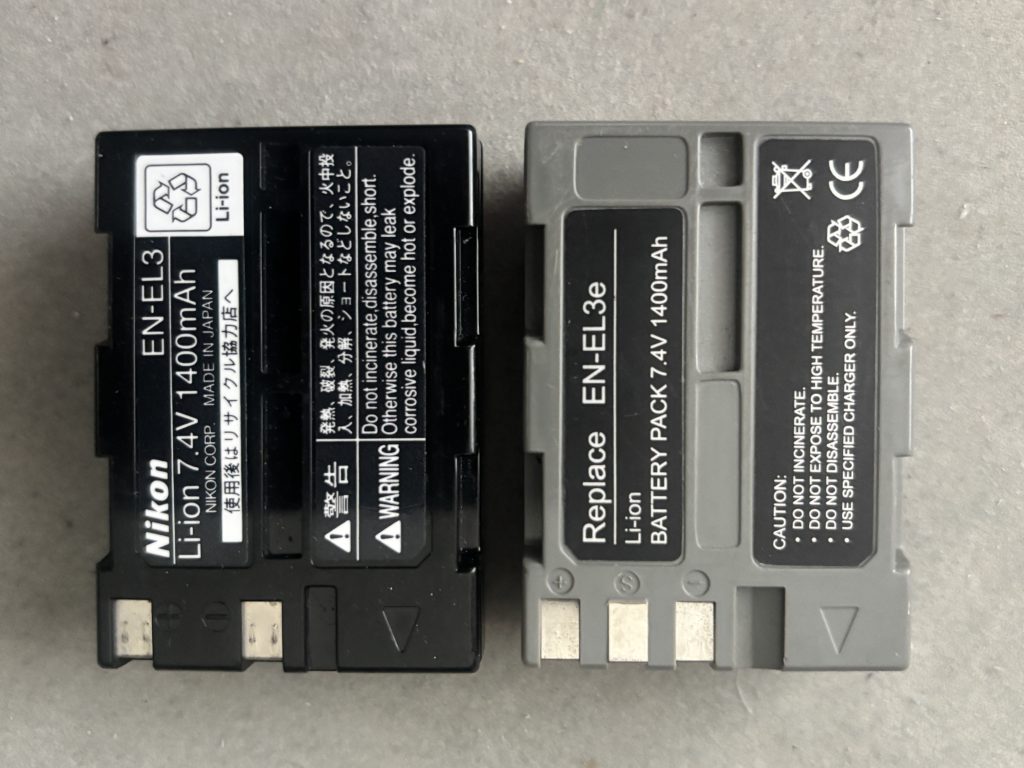
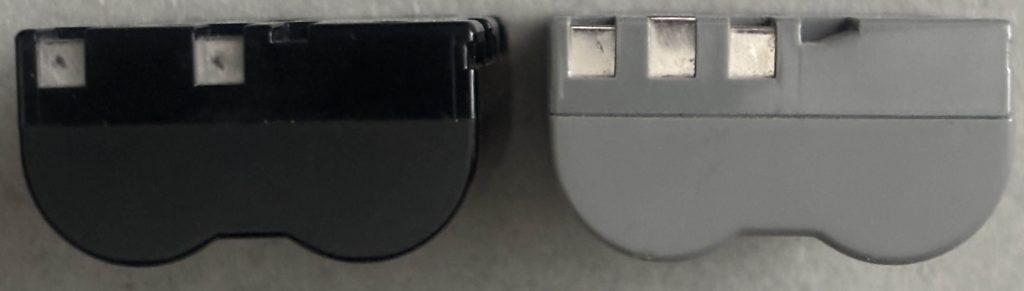
There is some confusion about which battery fits which Nikon camera and which charger you should use when considering the Nikon EN-EL3 (also supplied as the EN-ENL3a and Nikon EN-EL3e. This is not surprising as both batteries look pretty much the same, dimensionally at least. They’re both also Li-ion 7.4V 1400mAh. The real difference is the Nikon EN-EL3e has three contacts while the Nikon EN-EL3/EN-EL3a has just two.
The third contact on the EN-EL3e battery sits in the middle of the two contacts found on the EN-EL3. This third contact was added to provide additional information for Nikon’s D200 Digital SLR. The battery will however fit and work in older cameras. But the older two contact EN-EL3 battery will not go fully into the more modern three contact cameras as the camera’s third internal contact will prevent the battery from slipping all the way into the housing.
When it comes to the battery charger the MH-18 / MH-18a will charge both the EN-EH3 and the EN-EH3e batteries
Cameras that take the EN-EL3e battery Nikon D50 Nikon D70 Nikon D70s Nikon D80 Nikon D90 Nikon D100 Nikon D200 Nikon D300 Nikon D300S Nikon D700
Cameras that take the EN-EL3 / EN-EL3a battery Nikon D50 Nikon D70 Nikon D70s Nikon D100
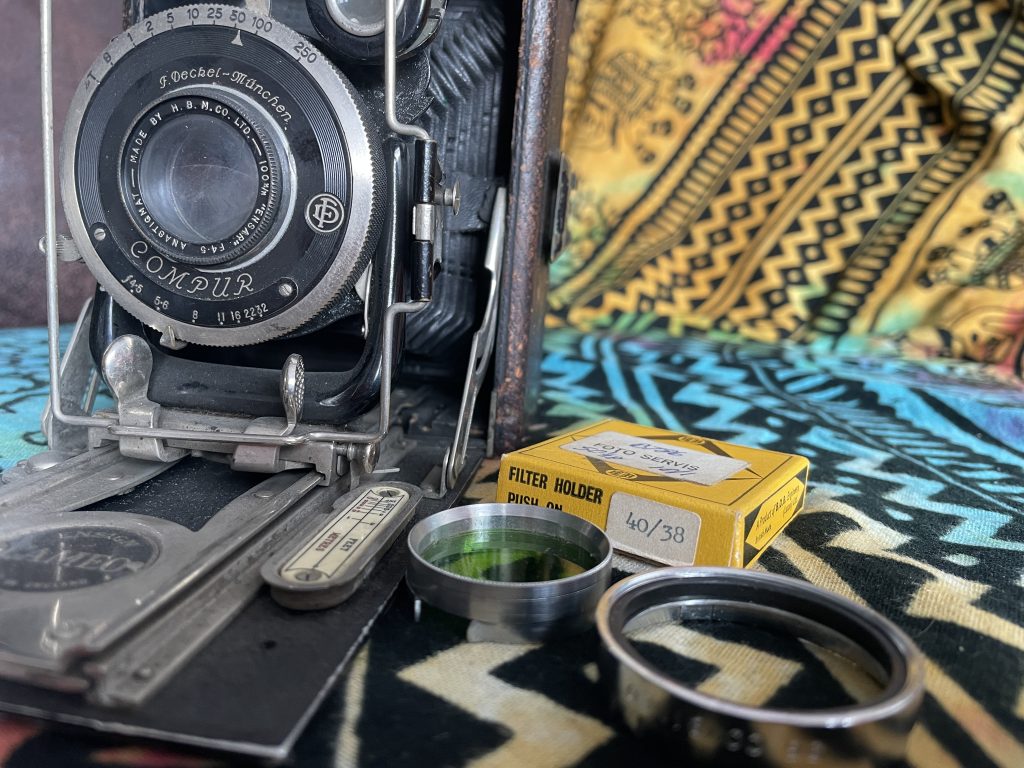
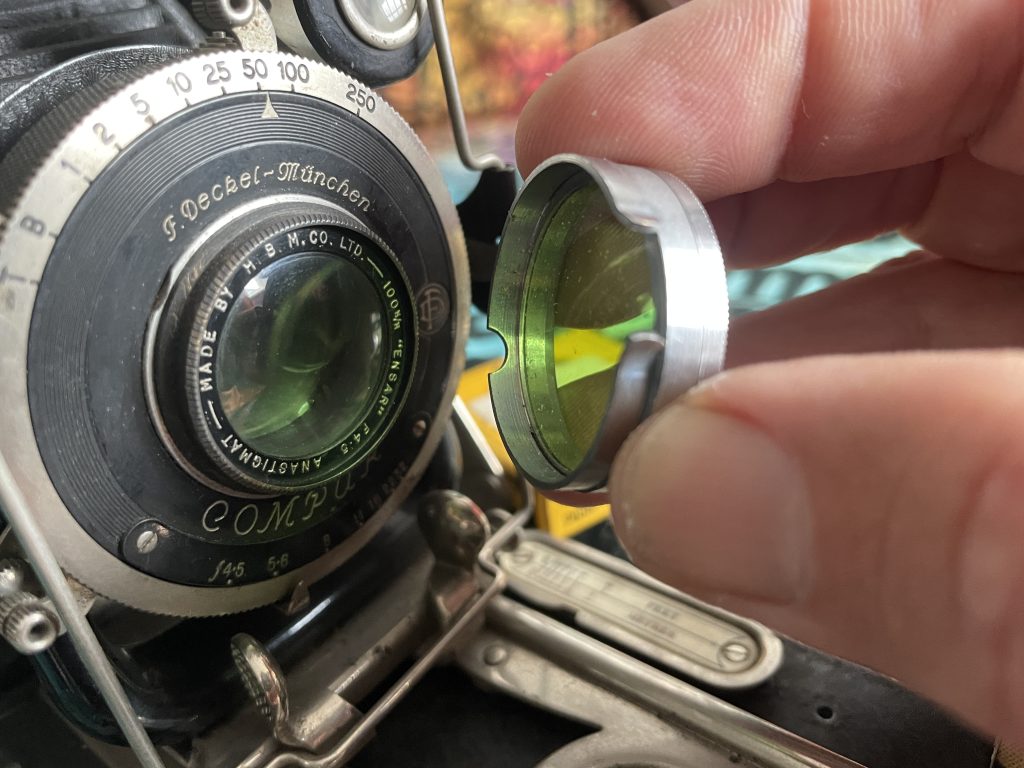
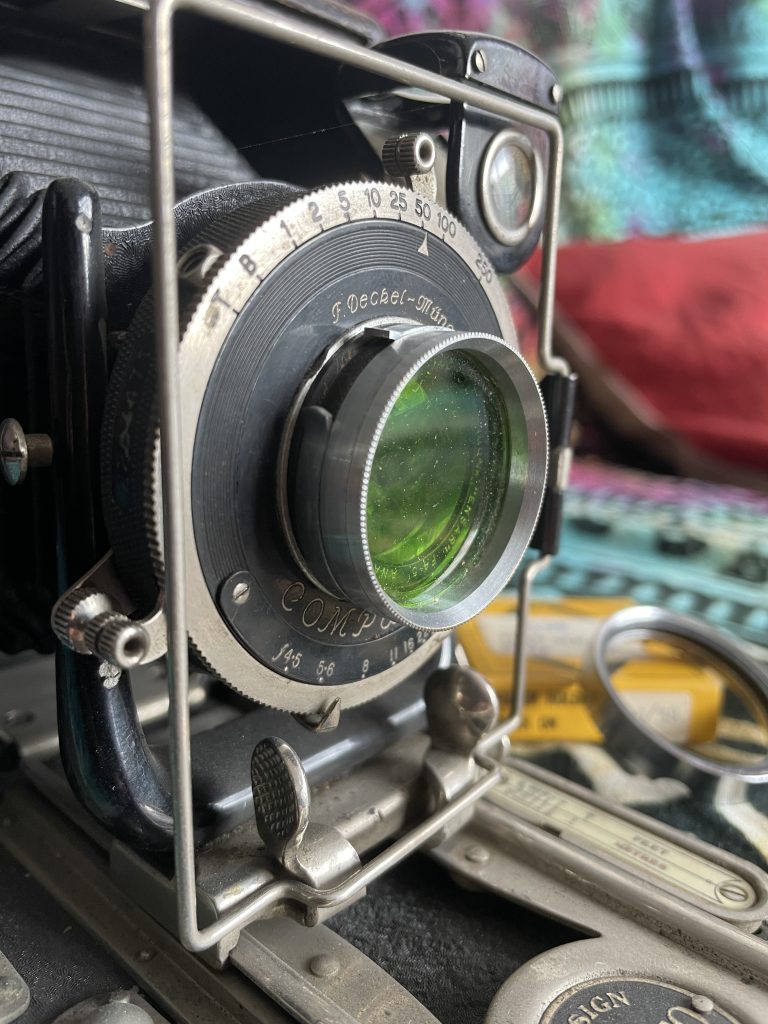
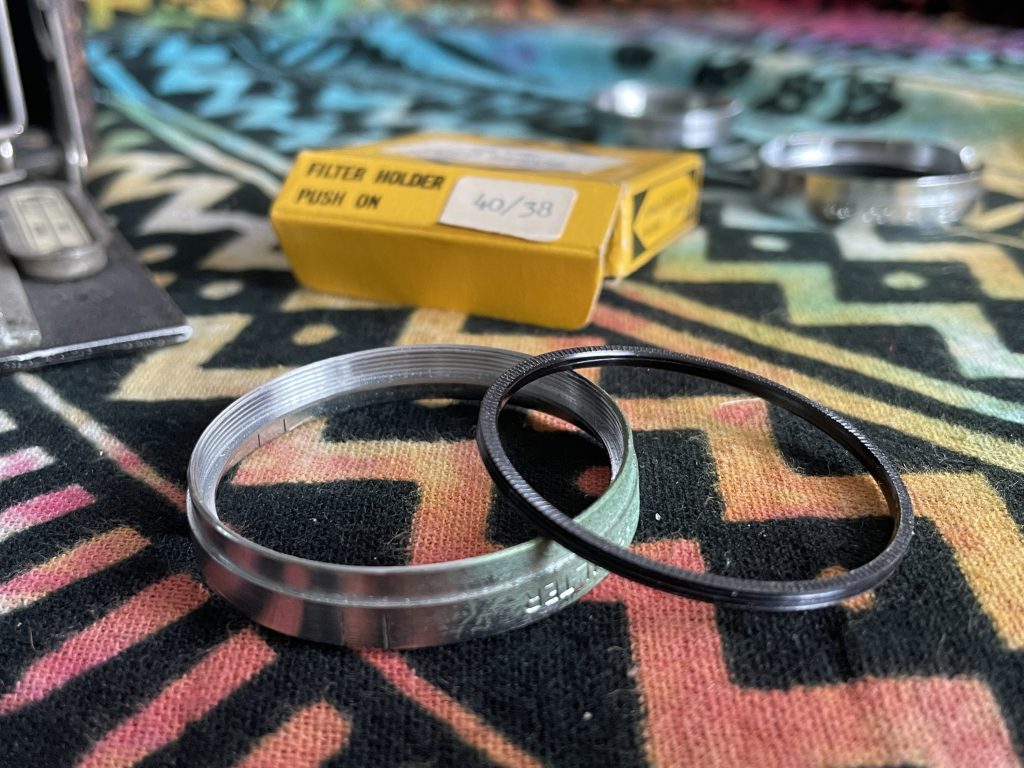
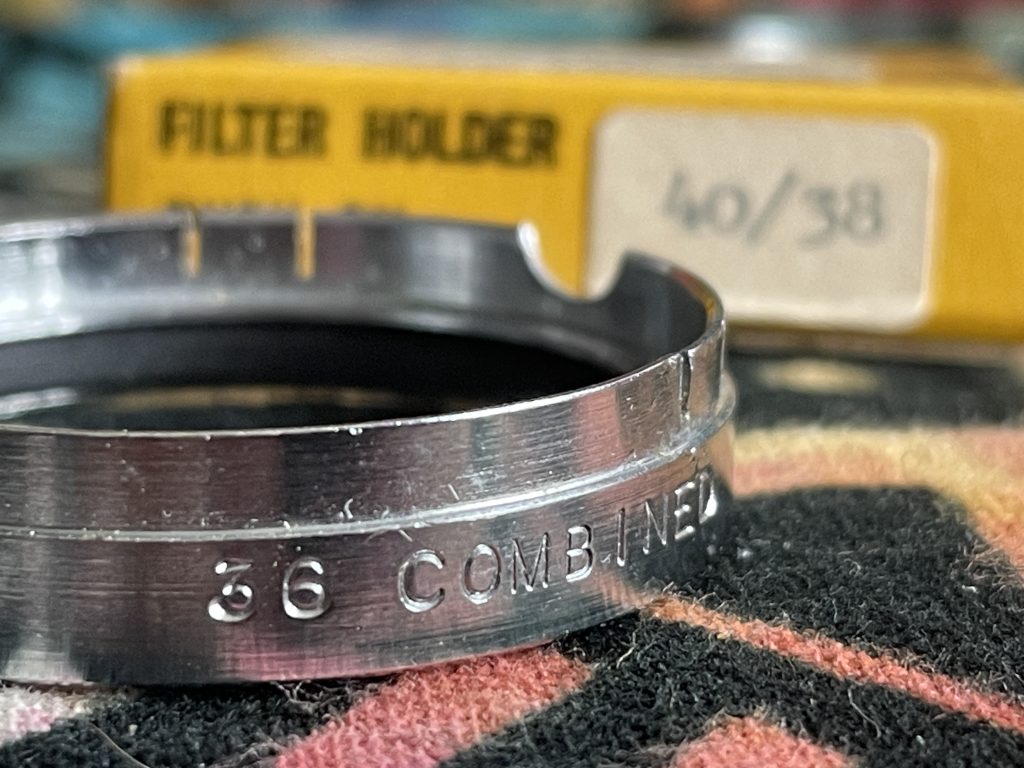
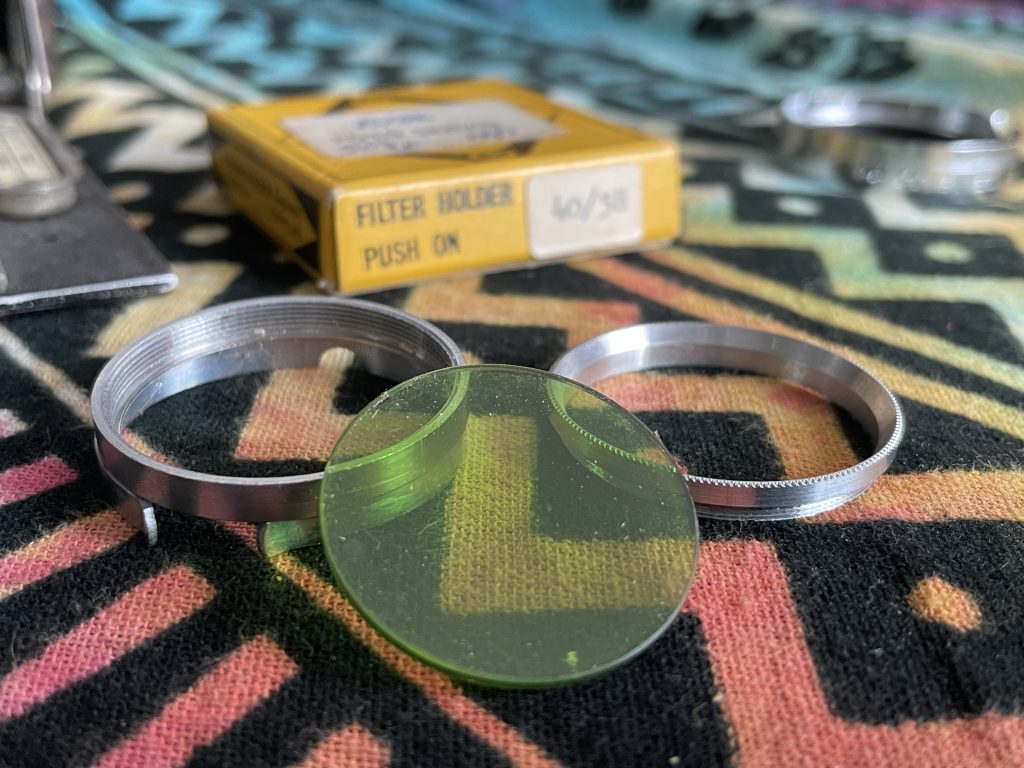
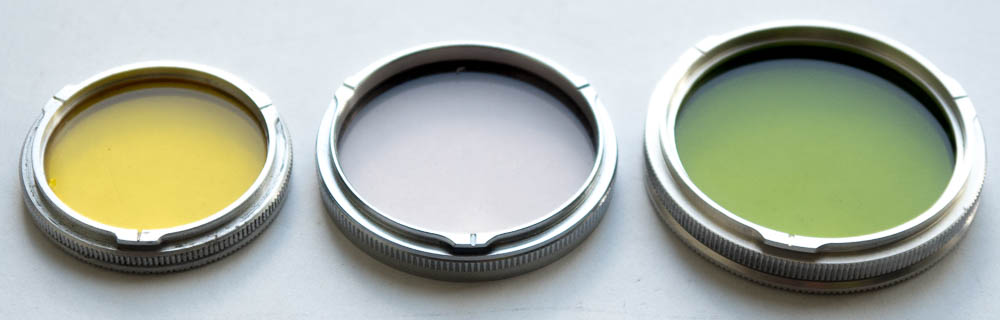
Many vintage cameras had a lens without a filter thread. Manufacturers such as BDB, Leech and Actina created push-on filters for users of that type of camera.
These filters, typical with an aluminium mount, push over the lens and hold in place with a small spring clip.
They came without a glass filter and had either a plastic or an aluminium retaining ring to hold the glass or resin circular filter in place.
They’re sold with two measurements in millimetres. The first number is the lens diameter, and the second is the added filter diameter. Usually just the push on size was engraved on the rim of the holder while both numbers appear on the box – eg 40/38.
There used to be a wide variety of glass filters that can still be found in second hand camera shops or auction sites and resin or gel ones can be easily cut to size from cokin or Kodak Wratten style filters so there’s many options to hand.
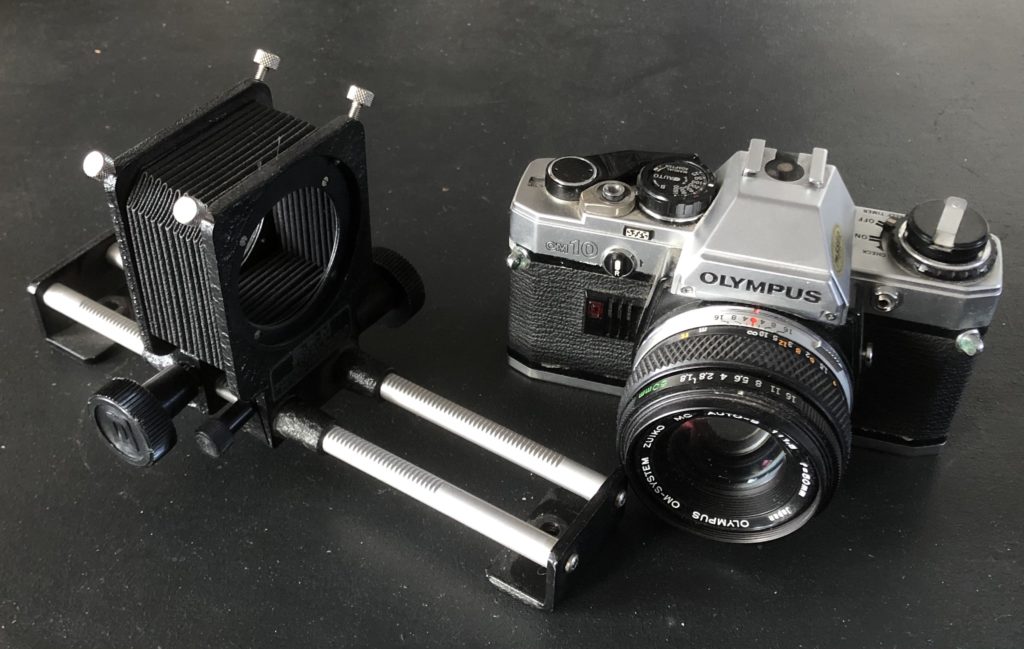
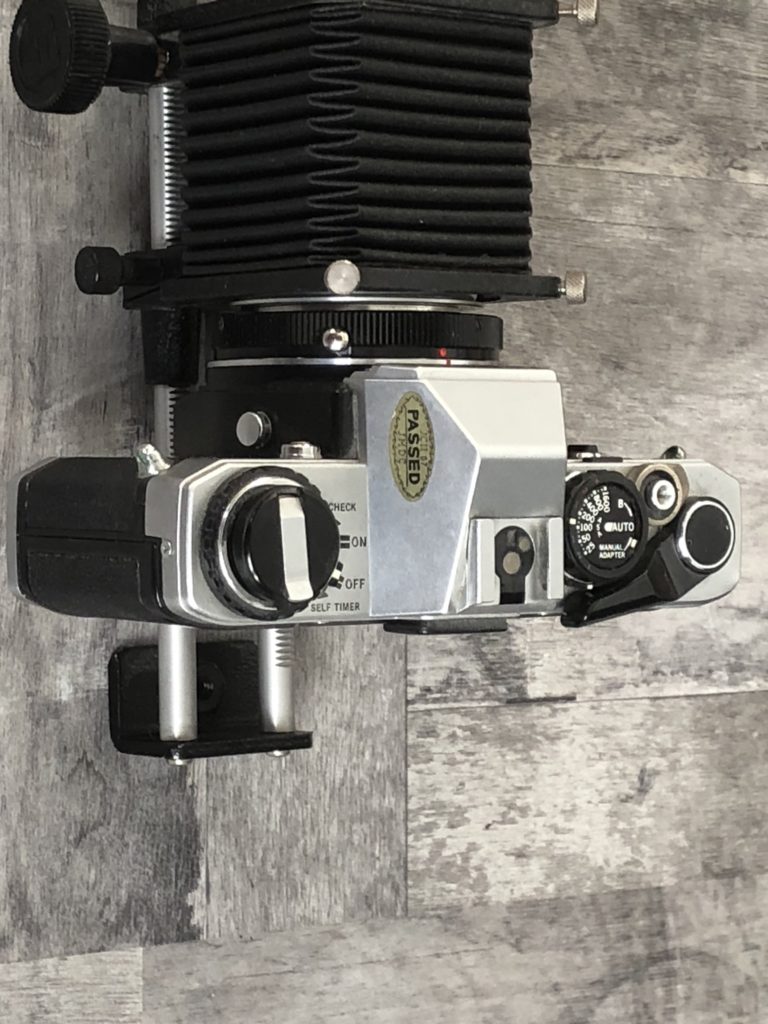
BPM Bellows were made way before 35mm autofocus and digital cameras came along with their newer more advanced electronic lens mounts. While Nikon and Pentax kept the same basic mount size and added electrical couplings, Canon, Minolta and Olympus changed completely so you wont find BPM adaptors for these cameras. That said many options have been reproduced in China and sell at low cost on eBay, and although the BPM system isn’t on their radar it is possible to cobble together an option that will allow your camers to fit BPM bellows.
Here are various options for the newer Canon, Minolta (also Sony) and Olympus (also Panasonic) camera mounts
How to attach a Canon EOS Lens to BPM Bellows:
You could buy a cheap Canon EOS fit accessory such as an extension tube or 2x converter (or even a broken EOS SLR body) and strip back to the mount which you can then stick to any BPM mount with superglue. A small extension tube would be ideal as there’s no glass to remove. Alternatively cut the centre out of a plastic Canon EOS rear lens cap and glue it to any BPM mount. Care obviously needs to be taken to A) centre it and B) make sure it’s stuck well enough to support the weight of the lens. If this is all too much bother you can buy a cheap lens that BPM made mounts for and attach that to the front with the necessary BPM lens mount. The beauty of the BPM system is any lens can be added to the front. It doesnt have to be camera brand specific.
How to attach a Canon EOS Body to BPM Bellows:
Same advice as above – using a mount from an existing EOS Canon item and glue to any BPM mount. If you got an extension tube or teleconverter, both sides can be utilised for body and lens fittings. Or there’s a Canon EOS T2 mount https://www.photographyattic.com/product-2984 that you can screw a BPM M42 screw mount adaptor to https://www.photographyattic.com/product-553. The T2 mount isnt exactly the same as M42 but it will screw in so far and be safe enough to use.
How to attach a Minolta Dynax / Sony Alpha Lens to BPM Bellows:
You could buy a cheap Minolta Dynax / Sony Alpha fit accessory such as an extension tube or 2x converter (or even a broken Minolta Dynax / Sony Alpha SLR body) and strip back to the mount which you can then stick to any BPM mount with superglue A small extension tube is ideal as there’s no glass to remove. Alternatively cut the centre out of a plastic Dynax/Alpha rear lens cap and glue it to any BPM mount. Care obviously needs to be taken to A) centre it and B) make sure it’s stuck well enough to support the weight of the lens. If this is all too much bother you can buy a cheap lens that BPM made mounts for and attach that to the front with the necessary BPM lens mount. The beauty of the BPM system is any lens can be added to the front. It doesnt have to be camera brand specific.
How to attach a Minolta Dynax / Sony Alpha body to BPM Bellows:
Same advice as before – using a mount from an existing Minolta Dynax / Sony Alpha item and glue to any BPM mount. If you got an extension tube or teleconverter, both sides could be used for body and lens fittings. Or there’s a Minolta Dynax T2 mount that you can screw a BPM M42 screw mount adaptor to https://www.photographyattic.com/product-553. The T2 mount isnt exactly the same as M42 but it will screw in so far and be safe enough to use. Or you can also buy a Minolta MD to Minolta AF adapter and use the BPM Minolta MD mount https://www.photographyattic.com/product-557 to attach the Minolta Dynax / Sony Alpha body BPM Bellows
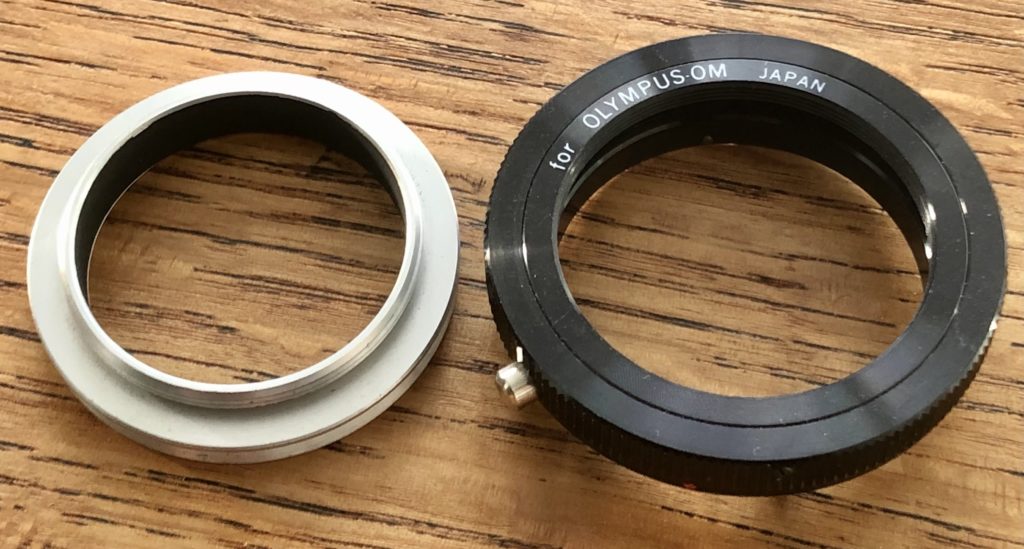
How to attach an Olympus / Panasonic Micro 4/3 Lens to BPM Bellows:
You could buy a cheap Olympus / Panasonic Micro 4/3 fit accessory such as an extension tube or 2x converter (or even a broken Olympus / Panasonic Micro 4/3 body) and strip back to the mount which you can then stick to any BPM mount with superglue A small extension tube is ideal as there’s no glass to remove. Alternatively cut the centre out of a plastic Micro 4/3 rear lens cap and glue it to any BPM mount. Care obviously needs to be taken to A) centre it and B) make sure it’s stuck well enough to support the weight of the lens. If this is all too much bother you can buy a cheap lens that BPM made mounts for and attach that to the front with the necessary BPM lens mount. The beauty of the BPM system is any lens can be added to the front. It doesnt have to be camera brand specific.
How to attach an Olympus / Panasonic Micro 4/3 Body to BPM Bellows:
Same advice as before – using a mount from an existing Olympus / Panasonic Micro 4/3 item and glue to any BPM mount. If you got an extension tube, both sides could be used for body and lens fittings. Or there’s a micro 4/3 to T2 mount https://www.photographyattic.com/product-1826– that you can screw a BPM M42 screw mount adaptor to https://www.photographyattic.com/product-553. The T2 mount isnt exactly the same as M42 but it will screw in so far and be safe enough to use.
The camera and lens have to be used in manual with each of the options above, as there is no way to have electronic coupling with the BPM Bellows system.
If you have trouble finding what you need to use BPM bellows please get in touch and we will try and help.
BPM bellows with its interchangeable mount system is all well and good, but what if you cant find the right mount for your camera body? BPM haven’t made mounts for well over two decades, so the modern camera mounts are impossible to find. And some of the older mounts, such as Yashica/Contax, Rollei 35SL and Olympus Pen, are as rare as rocking horse poo.
You could possibly find a factory with a moulding facility to create some, but that would be costly, or you could gain access to a 3D printer and make a mount, but in both cases you would need an accurate 3d technical drawing to ensure the mounts fit correctly. Thankfully there is a solution and it’s not too expensive.
Some lenses sold between the 70 and 90s had an interchangeable mount. This system known as the T2 system, which also attached to the rear of some accessories, such as slide duplicators, had a T2 mount that screws on to the rear side of the lens or accessory and provides the necessary fitting for your camera body. The thread of a T2 mount is similar to that of an M42 camera thread found on Zenit, early Pentax and Praktica bodies, but is just slightly different. A T2 mount will screw onto an M42 thread but it wont go all the way so you just get a few turns – enough to make it a secure fit and the reason for this tip.
If you buy a BPM Pentax / Edixa screw thread mount with a male thread you can screw this into a T2 mount to attach to the bellows so your camera body can be attached. T2 mounts were made in a wide range of fittings and due to the fact many of the original 80s accessories have been reproduced by Chinese manufacturers, they have made mounts for newer camera bodies. So it’s very likely the fitting you want is available, and easily accessible from suppliers on eBay if your local dealer doesn’t stock them. We even have a few here at PhotographyAttic if you follow this link: T2 Mounts for sale
There is much confusion when trying to fathom which vintage filter to buy for a Twin Lens Reflex camera that has a bayonet mount such as a Rolleiflex or Yashicamat. The reason is there are three sizes. Rollei Bayonet I Rollei Bayonet II and Rollei Bayonet III. The Bayonet I is sometimes described without the I because there wasn’t a Bayonet II or Bayonet III when it was introduced.
Well wouldn’t it be easy if all filters were marked with Bay-1, Bay-2 or Bay-3? Life’s not that simple!
To make things confusing manufacturers often left off these simple markings on their filters. And to make things even more confusing they added measurements in mm so a Bay-1 filter may be marked 28.5mm, which doesn’t seem to relate to its diameter. And to add icing to the confusion these filters were often renamed B30 or B-30.
So to help here’s our interpretation of the system and an easy way to check if the filter you have found on ebay or in the junk shop, flea market, antique centre, camera shop is the one you need.
Bayonet 1
Also known as: Bay I / B30 / B-30
Outer measurement: 37mm
Inside diameter: 30mm
Sometimes marked: 28.5mm
Fits: Rolleicord and Rolleiflex (with f/3.5 Tessar / Xenar), Yashica EM, Yashicamat, Yashicamat-124, YashicaMat-124G Minolta Autocord
Bayonet 2
Also known as: Bay II
Outer measurement: 41mm
Inside diameter: 34mm
Sometimes marked: 34 or 36mm
Fits: Rolleiflex (with f/3.5 Xenotar and f/3.5 Planar)
Bayonet 3
Also known as: Bay III
Outer measurement: 46mm
Inside diameter: 38mm
Sometimes marked 38mm
Fits: Rolleiflex (with f/2.8 Xenotar or Planar)
Hope this helps clear things up…and if you know different i’m sure you will let us know 🙂
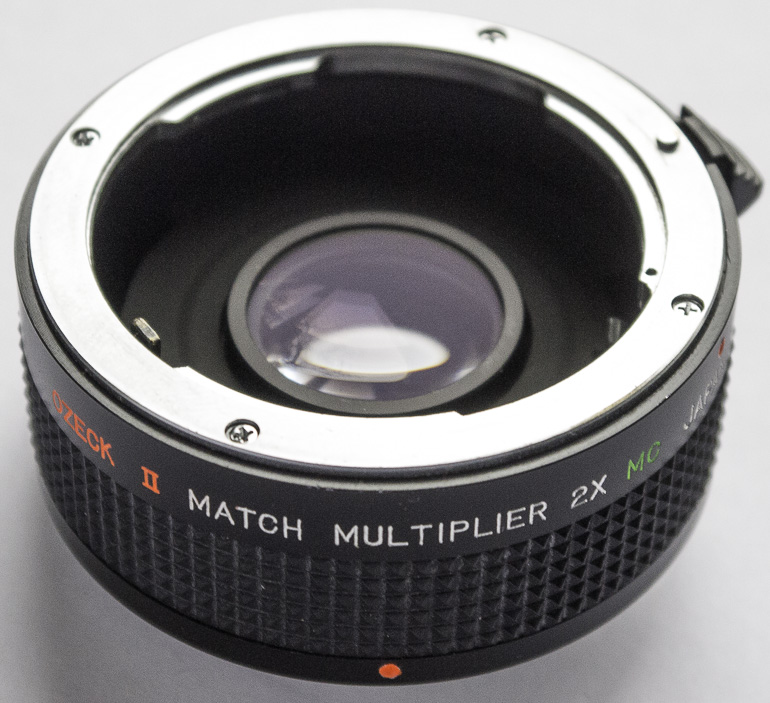
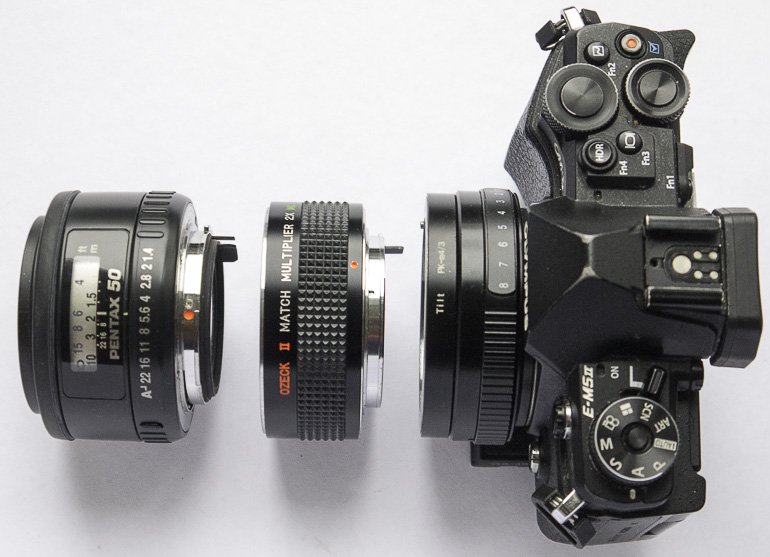
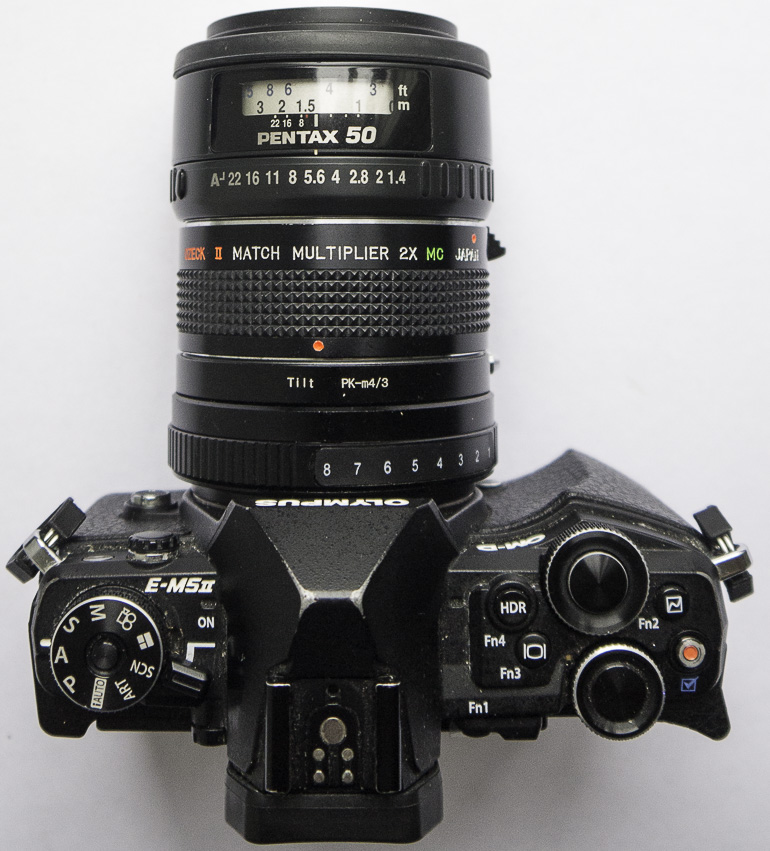
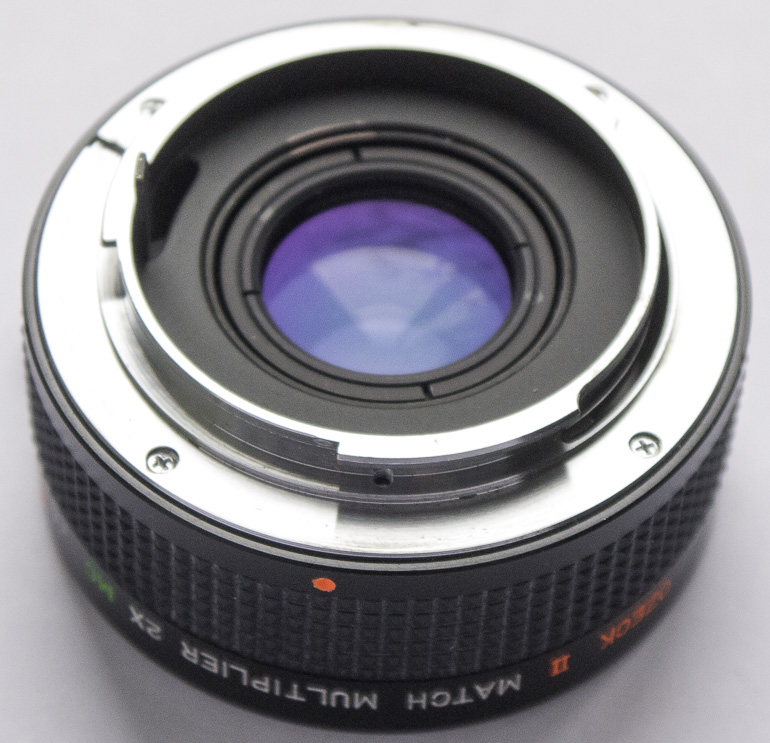
A teleconverter, also known as an extender, is a camera accessory that attaches between the lens and body of an interchangeable lens camera. They were made for 35mm and medium format cameras and are hard, if not impossible, to find for micro 4/3rd. That said this article is using one on a micro 4/3rds fitted with a Pentax K adaptor.
Whats does a teleconverter do?
A teleconverter increases the focal length of a lens by the number of x. The most common is 2x but models have also been made in 1.4x, 1.5x and 3x. With a 2x teleconverter your 300mm telephoto lens becomes 600mm.
What are the advantages of a teleconverter?
The main advantage is size and cost. A teleconverter and one lens takes up much less space than two lenses And it’s much cheaper to buy a teleconverter than a second lens.
Another advantage is the closest focusing distance of the lens doesn’t change when a teleconverter is attached so the magnification is doubled with a 2x from the same distance.
What are the disadvantages of a teleconverter?
The teleconverter adds a few more layers of glass for the light to travel through so there’s chance the image quality will be degraded. This is more noticeable on cheaper models where contrast can suffer as well as added distortion and reduced sharpness.
The teleconverter reduces the amount of light reaching the film/sensor by the same factor as the magnification. So a 2x converter loses two stops of light and a 3x converter loses three stops of light.
Can you use more than one teleconverter?
Its possible to add several teleconverters in a stack. Sharpness decreasing and light loss increasing with each one added. In this article Stacking five 2x teleconverters Petapixel stacked five teleconverters onto a 300mm lens to get a huge 9600mm telephoto.
A couple of test photos with a teleconverter Below are examples of two subjects taken with the illustrated combination above – an Olympus OMD EM5 MkII with a 50mm f/1.4 Pentax lens and a budget priced Ozeck 2x teleconverter. The left photos are without the 2x teleconverter and the right hand ones are with the teleconverter. The map is taken at the closest setting of the lens, and the city view is with the lens at infinity. The bottom pair are highly cropped pics from the city scene. You can click on the four top pics to see the full size version.
For those viewing on a mobile device 1, 3 and 5 are without teleconverter and 2, 4, 6 are with teleconverter
As you can see the converter loses contrast, but sharpness is not as bad as many people have made out over the years, and a converter is certainly a good idea if your budget is tight.
We have a selection of second-hand teleconverters here at PhotographyAttic – used teleconverters
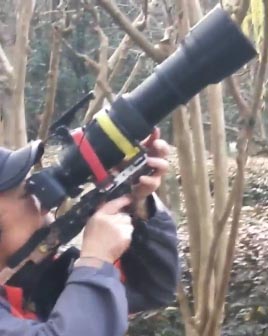
There’s a video doing the rounds at the moment titled Leon The Professional. It’s being shared by photographers who’re impressed by the featured photographer’s home made “shooting” accessory. The gent in question has adapted a wooden rifle stock to the bottom of his camera to create a comfortable hand holding gadget for long lens shooting …in this case bird photography.
Photographers who’ve been around before the digital age will remember this type of gadget is not new.
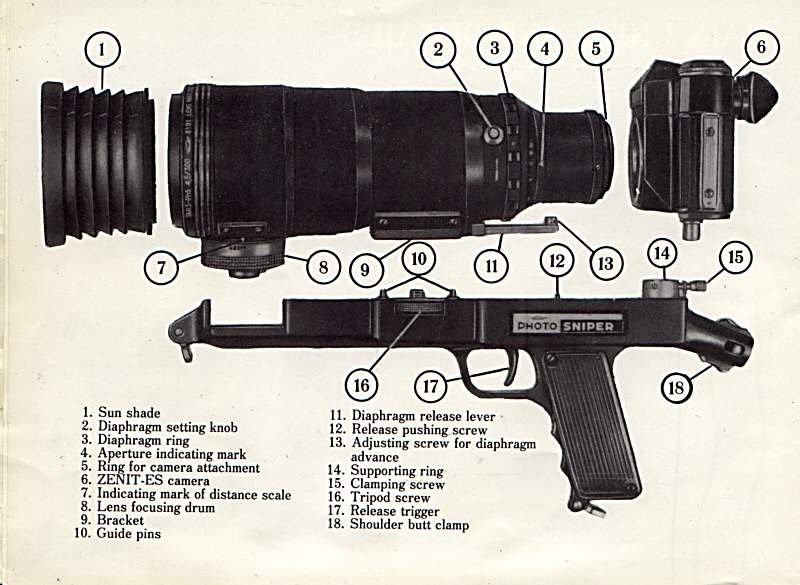
Back in the 70s they appeared in a kit from Russia called the PhotoSniper.
This was a Zenit camera with a chunky 300mm telephoto and a very realistic rifle grip below. Supplied in a metal box style case, at a very good bargain subsided price. But was seen as specialist gear as heavy and cumbersome for the majority of photographers.
Way before this in the 1950s-60s Novoflex had added a handle grip to the base of their long lenses in a gadget called the Pistol Grip Follow Focus. Available in 400mm, 600mm and 640mm with a 560mm joining the range in the 70s. This gadget focused the lens when the trigger was squeezed…later models had a push pull action to focus. Lots of imnformation about the Novoflex system here NOVOFLEX accessory system for Exakta Varex at Photo but More
In the 70s-80s thanks to the popularity of the SLR and rise of camera accessory brands several budget Japanese/German products appeared from the likes of Rowi, Hama and Kaiser that could be attached to the base of your 35mm SLR to convert into a rifle grip. The Kaiser Kamera – Schulterstativ 6005 Rifle Grip was one such example.
These were light weight and had a cable release attached to the trigger to make rifle shooting simple. Camera Retailers Jessops and Dixons also sold rifle triggers for under £20.
And throughout the history of the 35mm camera, manufacturers have produced trigger grips that attach to the base of the camera to provide alternative and more comfortable ways of holding and firing the shutter. These are just a simple hand grip shaped handle which are much lighter and far less bulky than the rifle grip.


 If you
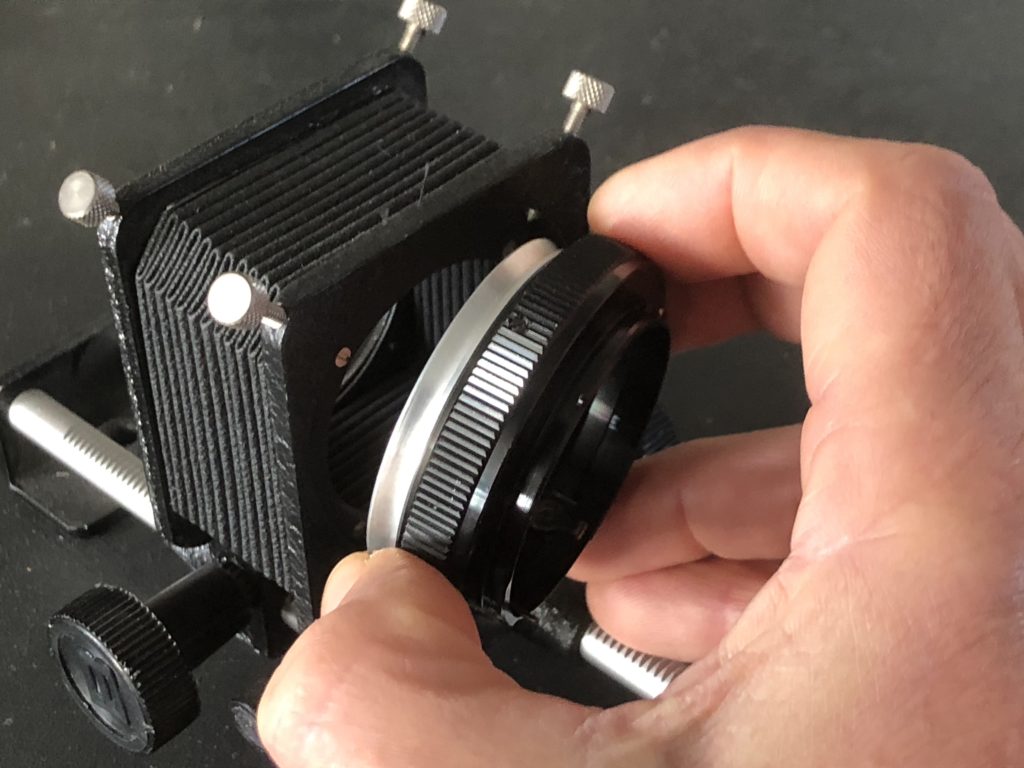


 There’s a video doing the rounds at the moment titled Leon The Professional. It’s being shared by photographers who’re impressed by the featured photographer’s home made “shooting” accessory. The gent in question has adapted a wooden rifle stock to the bottom of his camera to create a comfortable hand holding gadget for long lens shooting …in this case bird photography.
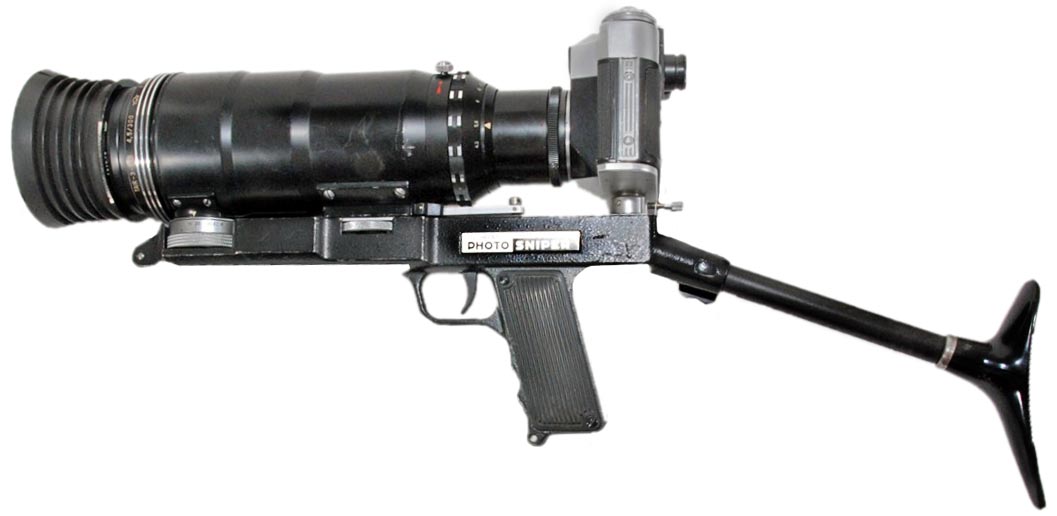 This was a Zenit camera with a chunky 300mm telephoto and a very realistic rifle grip below. Supplied in a metal box style case, at a very good bargain subsided price. But was seen as specialist gear as heavy and cumbersome for the majority of photographers.