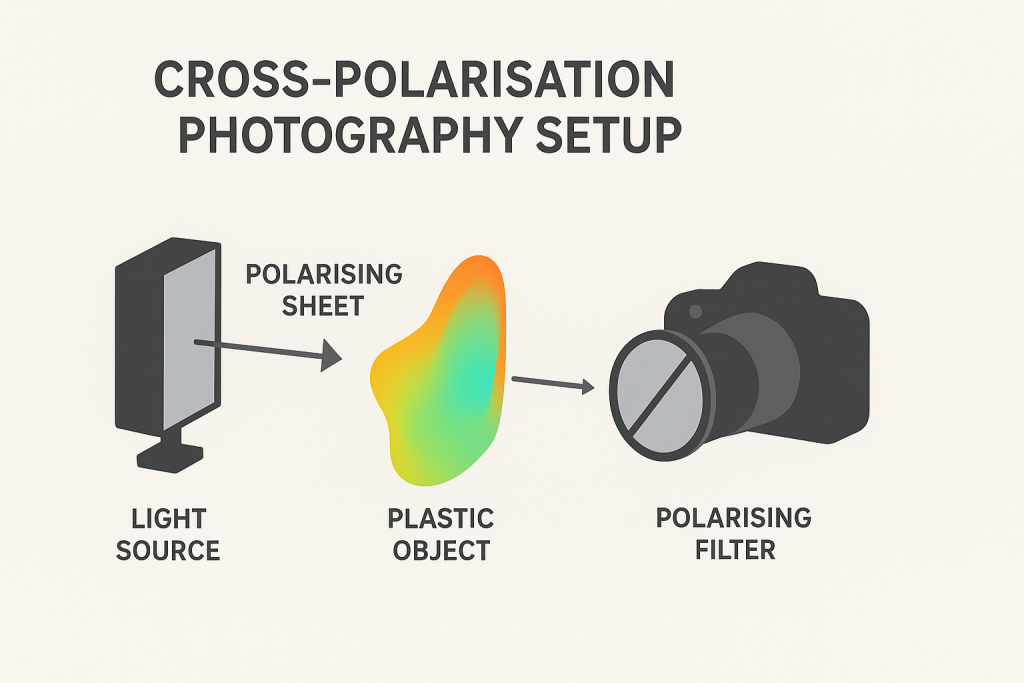
Cross-polarisation (or “cross-pol”) is a photographic technique where two polarising filters – one on the light source and one on the camera – are set at 90° to each other. When aligned correctly, the filters eliminate specular reflections and can reveal birefringence patterns in certain materials.

This guide walks you through exactly how to do it, using both studio and DIY setups.
1. Understanding the Core Concept
Light waves vibrate in all directions. A polarising filter only lets waves through that vibrate in one direction.
- Polariser A (on the light): Makes the light “uniform,” allowing only one vibration direction.
- Polariser B (on the lens): Blocks that direction and only passes waves vibrating 90° to it.
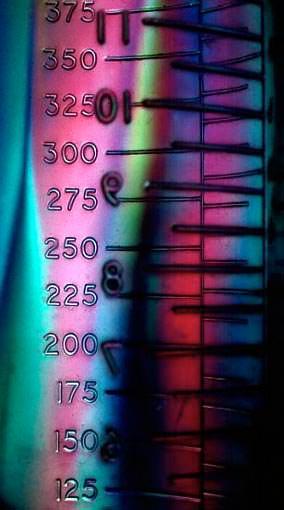
When the two filters are crossed, reflections vanish—but internal stress patterns inside transparent plastics glow with vivid colours.
Think of it as cancelling the surface glare so you can see the hidden interior world.
2. What You Need
You don’t need a fancy studio. Here are options for every budget:
Essential Equipment
- A camera (phone, mirrorless, or DSLR)
- A polarising filter for the lens
- Circular polariser (CPL) for most photography
- A polarising sheet for your light source
- Linear polarising film is inexpensive and sold in A4 sheets
Optional but helpful
- Two or more small LED panels (or even tablet screens)
- Diffuser (white fabric or tracing paper)
- Tripod (recommended)
- Black background
3. Setting Up the Cross-Pol Lighting
Step A: Polarise your light
- Place the polarising sheet in front of your light source.
- If your light produces hotspots, add a diffuser behind the polarising film.
- Make sure the polarising film covers the light completely – any uncovered portion will leak unfiltered light into your shot.
DIY tip:
A tablet or phone screen already emits polarised light – great for photographing small plastics like cutlery or toys.
4. Prepare Your Camera
- Attach the CPL to your camera or phone adapter.
- Point the camera at the polarised light.
- Rotate the CPL slowly.
You’ll notice the light visibly darkening when the two polarisers reach a 90° relationship.
This is your cross-polarisation achieved.
5. Shooting Techniques
A. For Stress-Pattern Photography
Used with clear or translucent plastics.
- Place the plastic object between the light and the camera.
- Cross the polarisers (maximum black).
- Increase exposure slightly to compensate for light loss.
- Fine-tune the angle of the object – some stress patterns appear only at certain orientations.
- Use a black or very dark background to intensify colours.
Common objects that reveal stunning patterns:
- Sunglasses
- Water bottles
- Tape dispensers
- Plastic spoons
- Acrylic sheets
B. For Reflection-Elimination Photography
Used for glossy surfaces, jewellery, metal, and liquids.
- Position your subject so the polarised light hits it at ~45°.
- Rotate the CPL until reflections disappear.
- Adjust your lighting angle if you see “patches” of unpolarised reflections.
This is extremely useful for product photography.
6. Exposure and Camera Settings
Cross-pol setups reduce the amount of light reaching the sensor. To compensate:
- Increase ISO moderately (200–800)
- Use longer shutter speeds (especially with tripod)
- Open your aperture (f/2.8–f/5.6 works well)
Avoid raising ISO too high, as cross-pol images often contain smooth gradients where noise becomes visible.
7. Compositional Tips
- Use backlighting for the strongest birefringence effects.
- Rotate the subject slowly – stress colours shift dramatically.
- Try using two polarised lights for symmetrical objects.
- For artistic images, place multiple plastic objects overlapping to create abstract colour fields.
8. Troubleshooting
Problem: Colours look flat or dull
- The polarisers may not be perfectly crossed – rotate the CPL again.
- Your light source might not be fully covered by polarising film.
Problem: Still seeing reflections
- Some reflections can bounce off walls and bypass the film – darken your shooting environment.
- Check if any secondary light source is unpolarised.
Problem: Image too dark
- Add more light intensity.
- Widen your aperture.
- Use longer exposure.
Problem: Colour bands too chaotic
- Stress in objects varies naturally; try a different piece of plastic or rotate the one you’re using.
9. Creative Experiments
Try these once you’ve mastered the basics:
Cross-Polarised Portraits
This requires larger sheets of polarising film but removes skin shine and gives a matte, painterly look.
Cross-Pol Liquid Photography
Put clear liquids in glass containers – some oils and gels show subtle interference colours.
Scientific Documentation
This technique is used in archaeology and materials analysis to detect manufacturing stress patterns.
10. Final Tips for Better Results
- Keep the scene as simple as possible – controlled light is everything.
- Always clean your polarisers; smudges will show.
- Work slowly: tiny adjustments create dramatic changes.
- Embrace the unpredictability – cross-pol is part science, part magic.
You can buy your polarising filter from Photography Attic here: Polarising filters
Leave a Reply